The question we’re going to be looking at today is inspired by our course, Server-side Tagging In Google Tag Manager.
How do I assign a static IP address to the outgoing requests from my server-side Google Tag Manager container?
When you send requests to vendor servers through your server-side Google Tag Manager container, those requests get assigned an IP address from a pool of addresses that Google reserves for outgoing network requests.
The range of available IP addresses is extremely vast, and it can change over time.
Normally, this isn’t a problem, and your server-side forwarding setup will work just fine.
However, occasionally you’ll work with vendors and other connected systems that need to allowlist the IP address(es) of all requests to the vendor servers.
For a scenario like this, we need to figure out how to assign a static IP address to the outgoing requests to the vendor servers.
This article will walk you through the steps required to set this up in the Google Cloud Platform. It dives deep into the murky world of cloud networking, but as always we’ll try to keep it understandable and reproducible.
Video walkthrough
If you prefer this walkthrough in video format, you can check out the video below.
Don’t forget to subscribe to the Simmer YouTube channel for more content like this.
How does it work?
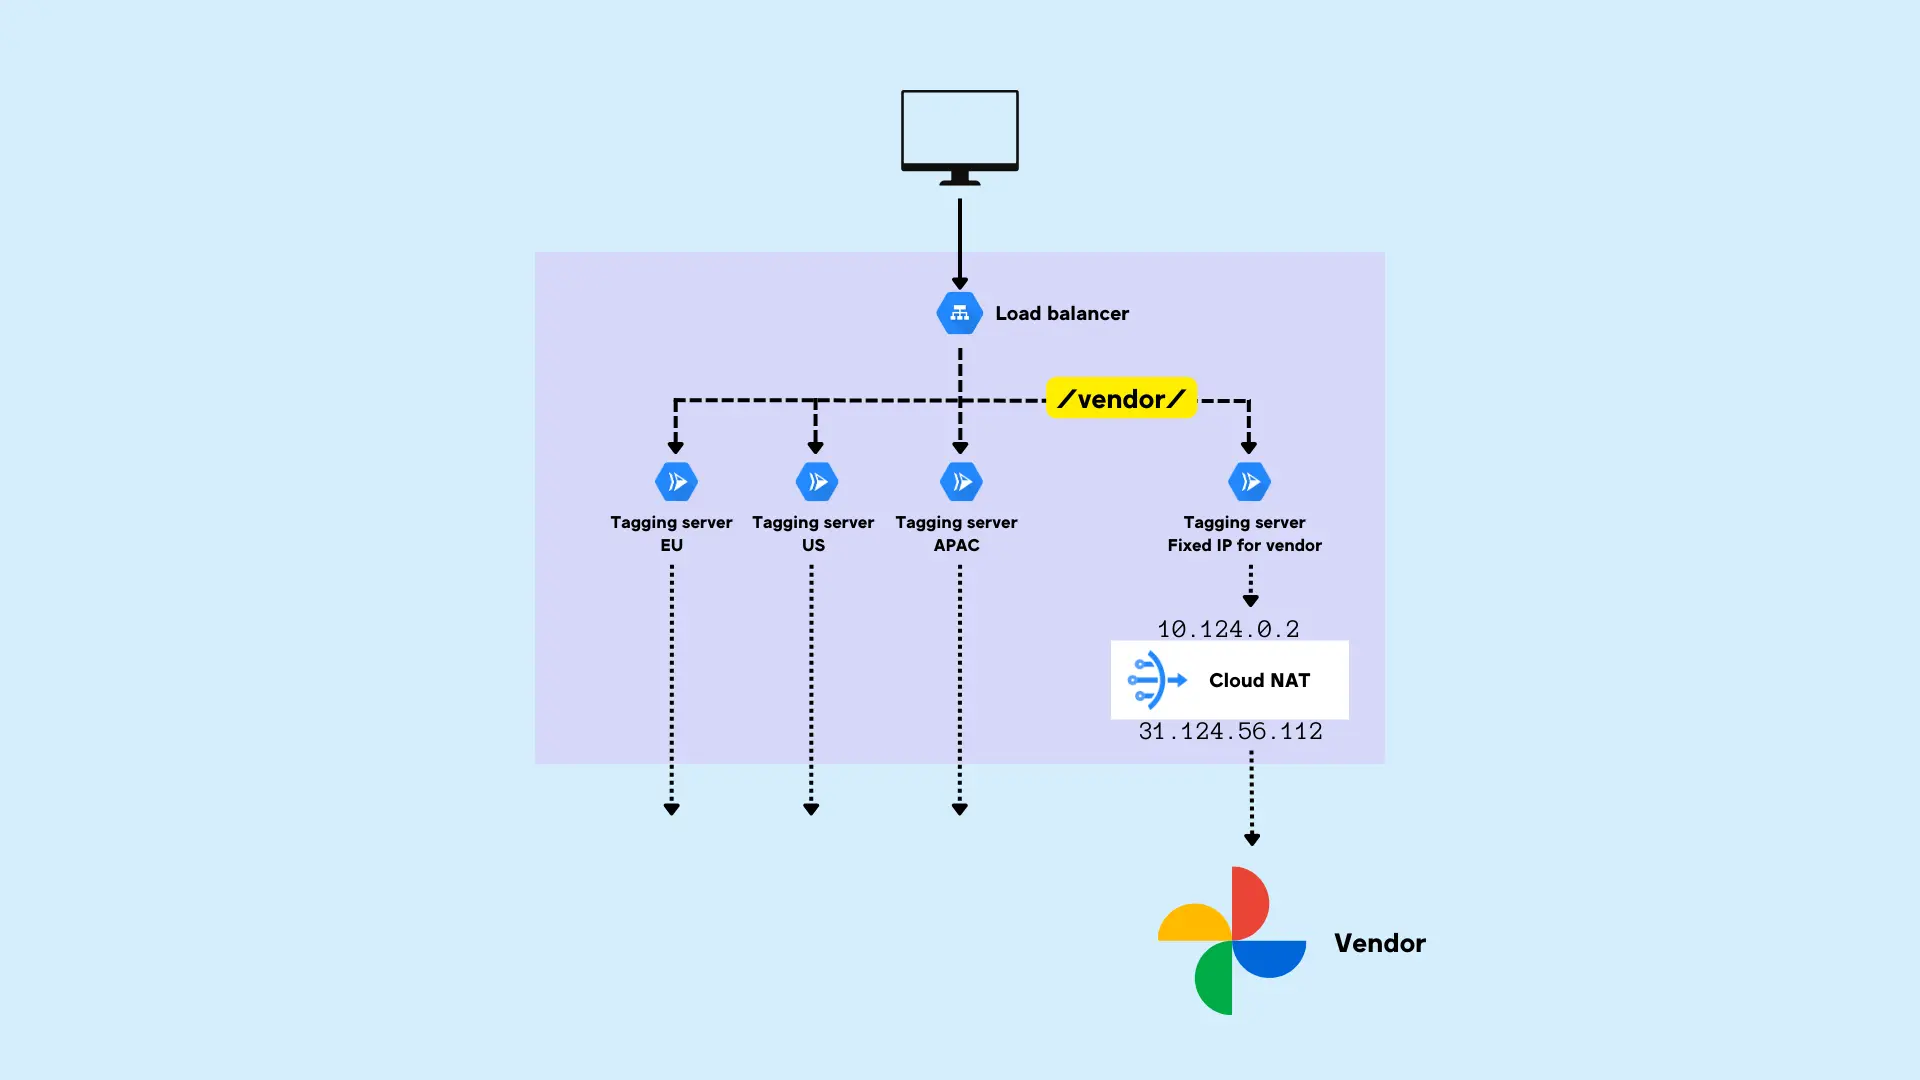
Normally, when your server container sends an outgoing request, for example using a tag or a client, that request will be associated with one of many, many possible IP addresses.
To make the requests always use the same, static IP address, we need to utilize something called a virtual private cloud (VPC).
VPC is how the Google Cloud Platform allows GCP’s own services (like Cloud Run) to communicate with each other without having to use the public internet. It’s basically a pipeline for internal network communications, using a range of internal IP addresses to do so.
In GCP, you can use something called a Cloud NAT gateway (NAT stands for network address translator). This can take a request that came through the VPC with an internal IP address, and map it to a static external IP address before forwarding the request to its destination.
Here’s what we’ll need:
- We need a new Cloud Run tagging server reserved only for the requests that need the static IP address.
- We need to edit the Load Balancer to make sure that incoming requests that have the vendor signature (for example a path matcher or a URL query parameter) are forwarded to the new Cloud Run server.
- We need to create a serverless VPC connector that forwards hits from this Cloud Run server to the VPC instead of the outside internet.
- We need to reserve a new static external IP address for the outgoing requests from this Cloud Run server.
- We need a Cloud NAT gateway that assigns the static IP address to all the requests that pass through this particular VPC subnetwork.
In our design, all of these services will run in the same cloud region. Creating a multi-region setup for this would be even more complicated, and even more costly. I don’t recommend you do it before you’ve tried it out with a single service pipeline in a single region.
Setting this all up is going to be complicated and the serverless VPC connector is somewhat costly. You’ll really need to think if complying with these vendor allowlists is worth it.
Nevertheless, hopefully this article will be useful in terms of understanding better how VPC works within the Google Cloud Platform.
Step 1: Reserve a VPC subnetwork
First thing we’ll need to do is reserve a range of internal IP addresses for this pipeline alone.
When your Cloud Run server sends the requests through the VPC, it will use an internal VPC subnetwork that you’ve reserved for this pipeline.
That way we can do a nice separation of concerns. By reserving a unique subnetwork just for this static IP pipeline, we can avoid any clashes and conflicts with other Google Cloud services running in the project, which might also be using VPC for communicating cross-service.
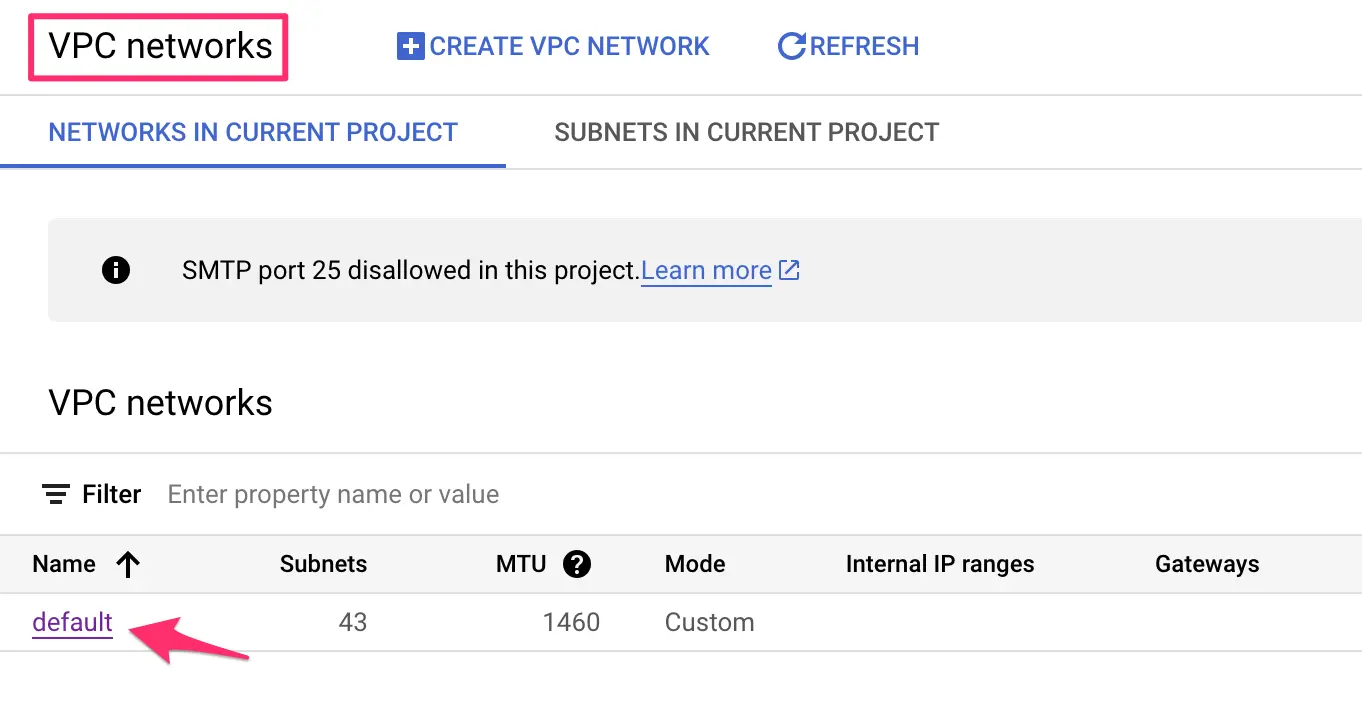
Browse to VPC networks in the Google Cloud Platform and click the default network to open it.
You could create a new VPC network for this, but reserving a separate subnetwork is quite enough for most cases.
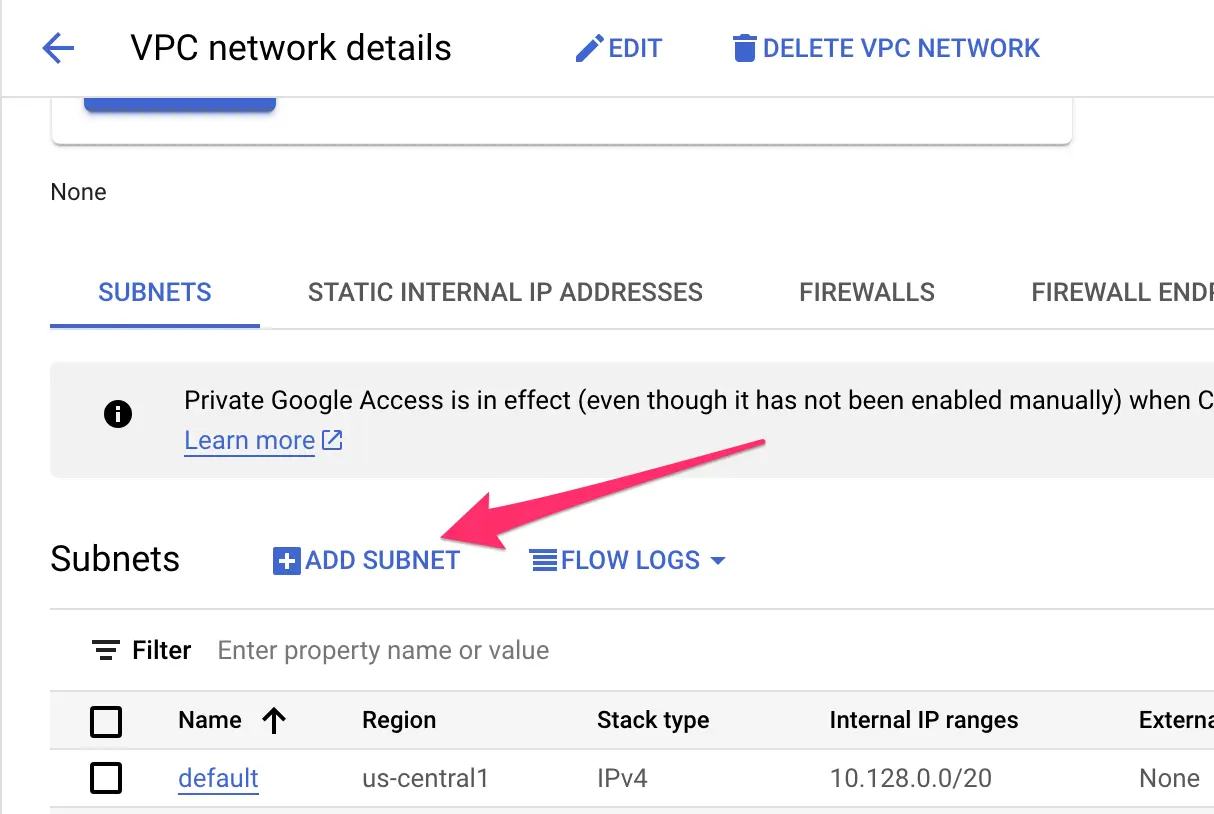
Scroll down to Subnets and click + ADD SUBNET.
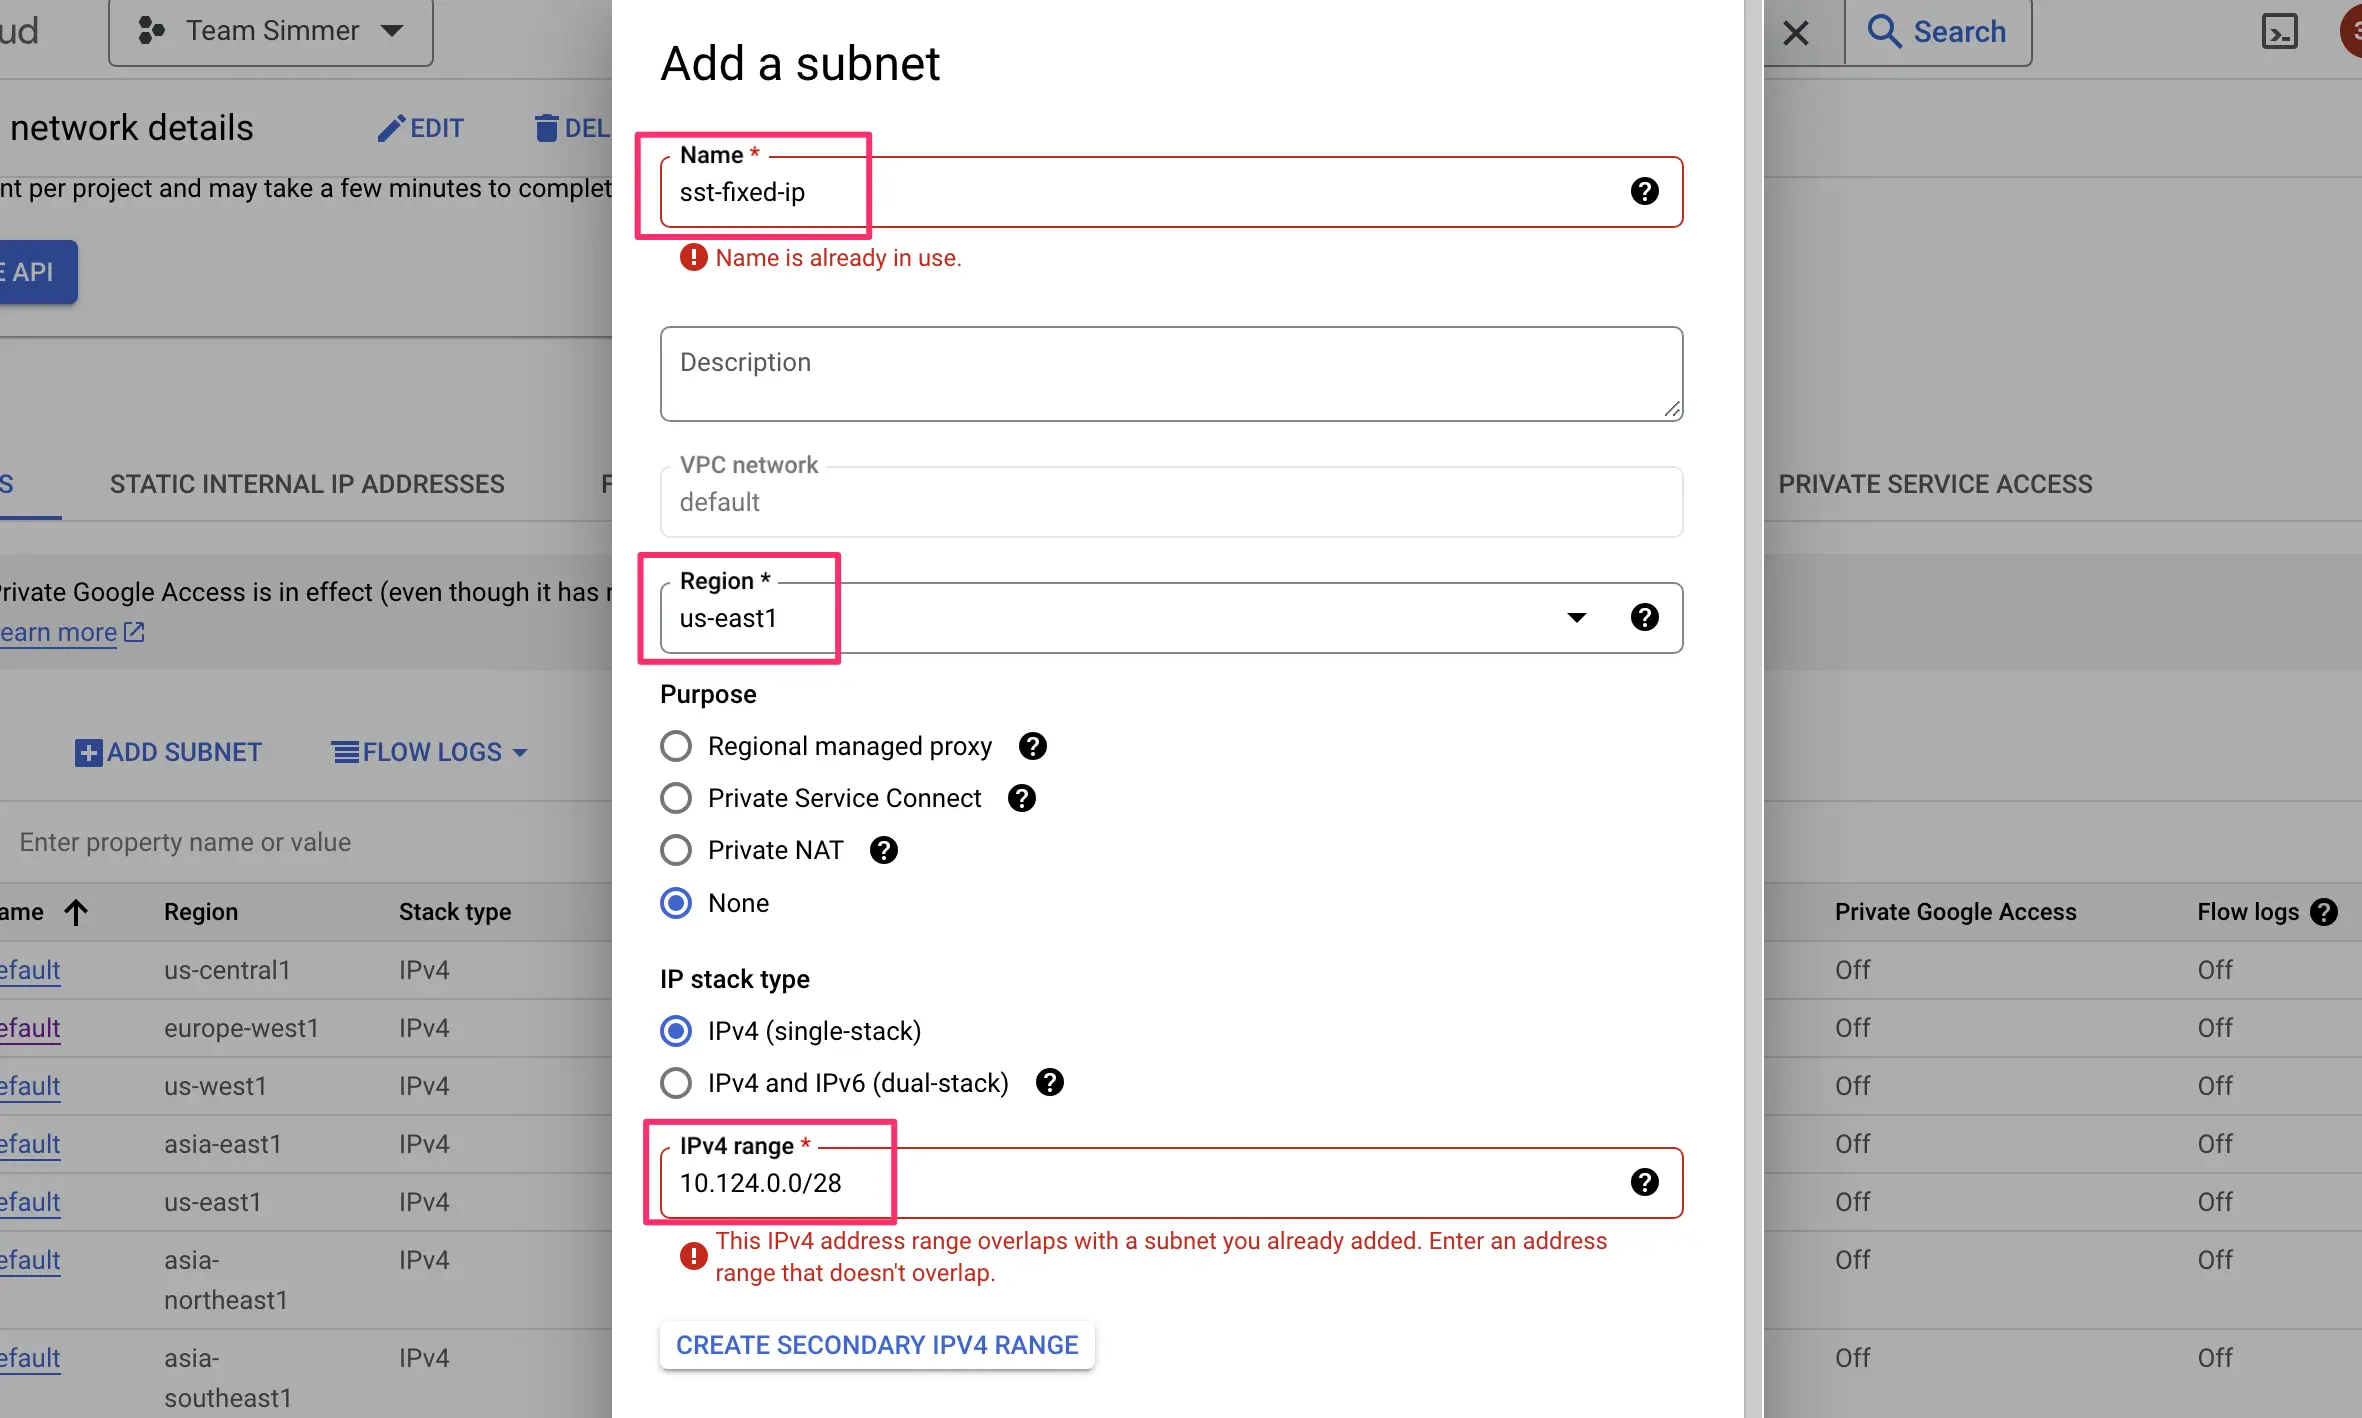
Give the subnet a name.
For clarity’s sake, I’ve named all the services in this pipeline with the same name: sst-fixed-ip. You can choose another naming convention, of course.
Choose a region for this subnetwork. I recommend setting up all the services in the pipeline in the same region. This is required for certain components (such as the serverless VPC connector and the subnet), but again, for clarity’s sake, it makes sense to run everything through the same region.
Generally, I’d recommend choosing a region that’s both geographically close to the bulk of your visitors whose requests go to these vendors, and that supports a good range of Google Cloud products. You can find a list of regions here, but in my examples I use the us-east1 cloud region.
The last thing you’ll need to configure in the subnetwork is the IPv4 range. You need to choose a range that isn’t already reserved in your VPC network.
If this is the first time you’re creating a subnetwork in the default VPC network, you can choose a range like 10.124.0.0/28, as that should not be reserved yet.
Whichever range you choose, make sure the range ends with /28, as that’s the required number of bits for the serverless VPC connector.
Here’s what my subnetwork setup looks like. Ignore the warnings you see, I’ve already created the subnetwork and this screenshot just shows what the configuration would have been originally.
Once configured, click the ADD link at the bottom of the overlay. Finally, scroll down the list of subnetworks and you should see your newly created subnet at the bottom of the list.
Step 2: Create the Serverless VPC Connector
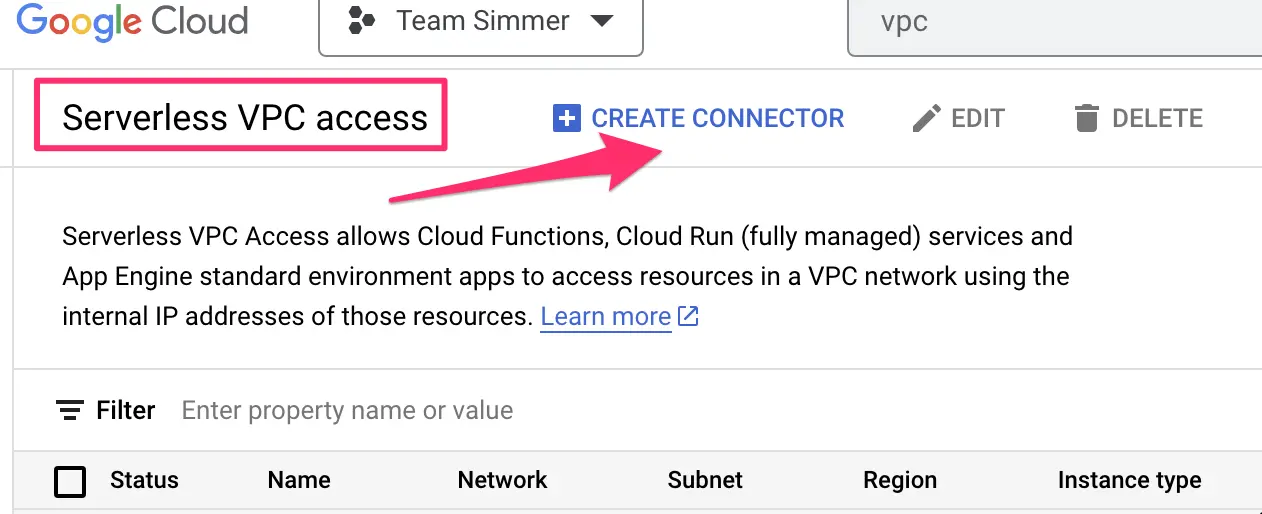
Next, we’ll need to create the connector that forwards the outgoing requests from our Cloud Run server to the VPC.
Navigate to serverless VPC access in the Google Cloud Platform and click to create a new connector.
Give the connector a name (e.g. sst-fixed-ip), set the Region to match the subnetwork that you just reserved, and choose the Network and Subnet accordingly. Make sure the subnetwork you choose matches the one you just created.
This is what my setup looks like:
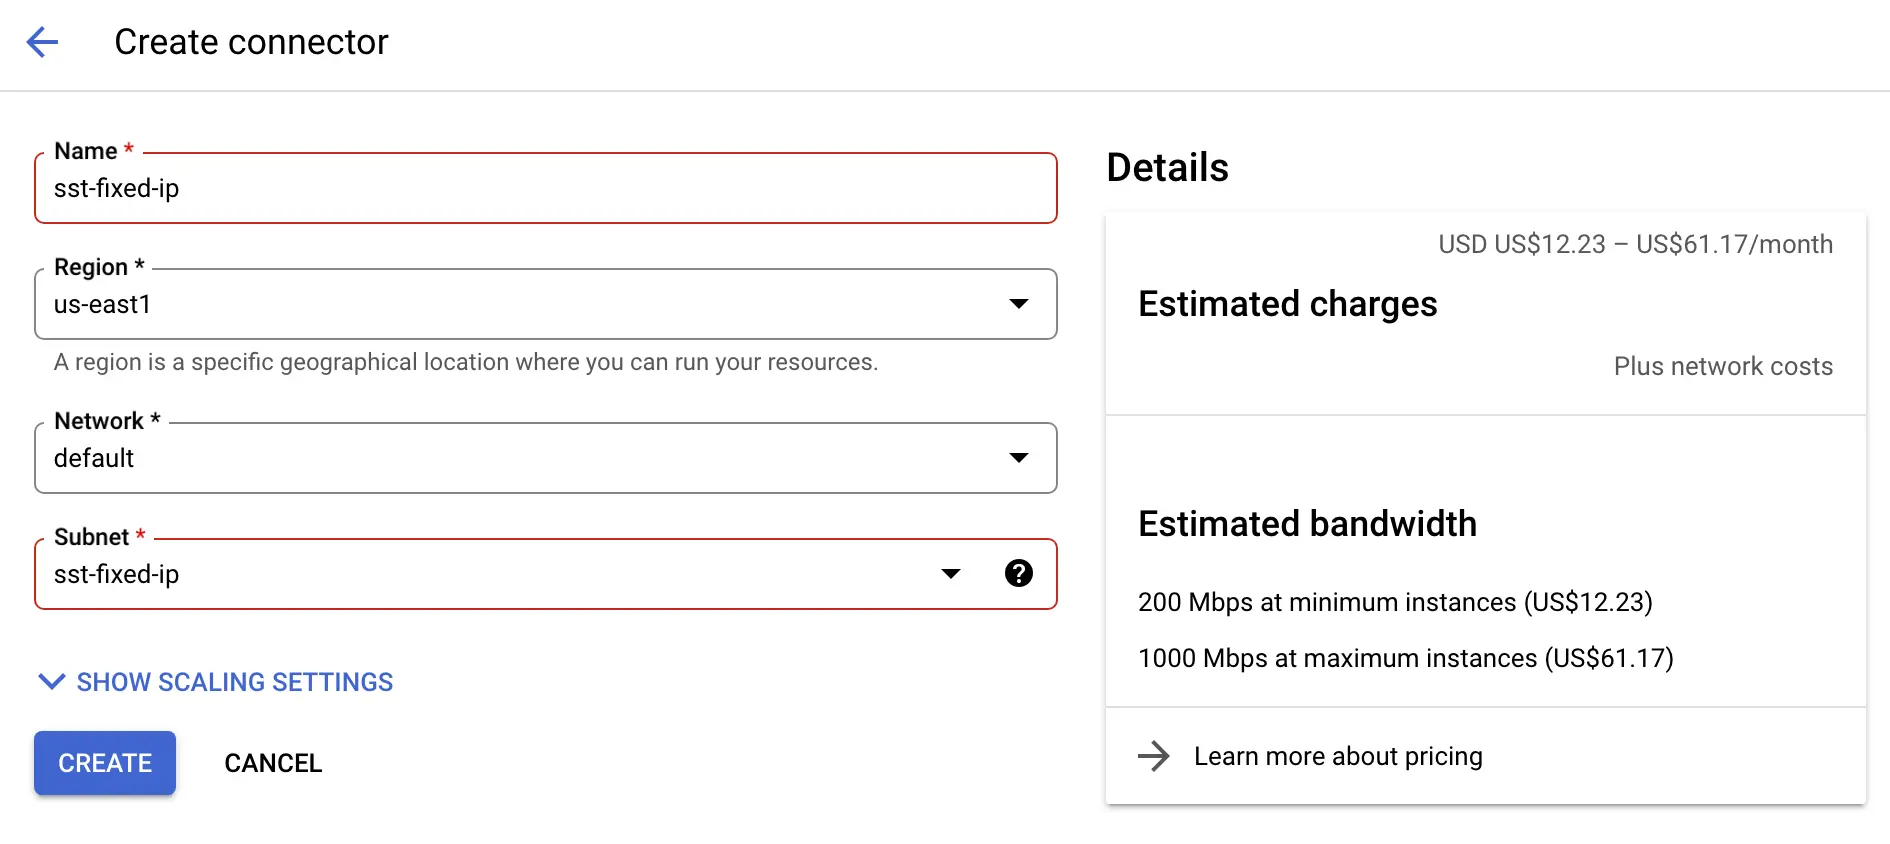
Here you can also see the estimated charges. The VPC connector runs on a stack of virtual machines, and you’ll need to pay for those in addition to the network egress costs for sending the requests to the outside internet.
You might be tempted to modify the scaling settings, but as you can’t go below the minimum of 2 instances, it doesn’t really make sense to change the scale at this point. You can always adjust after the pipeline has been running for a while.
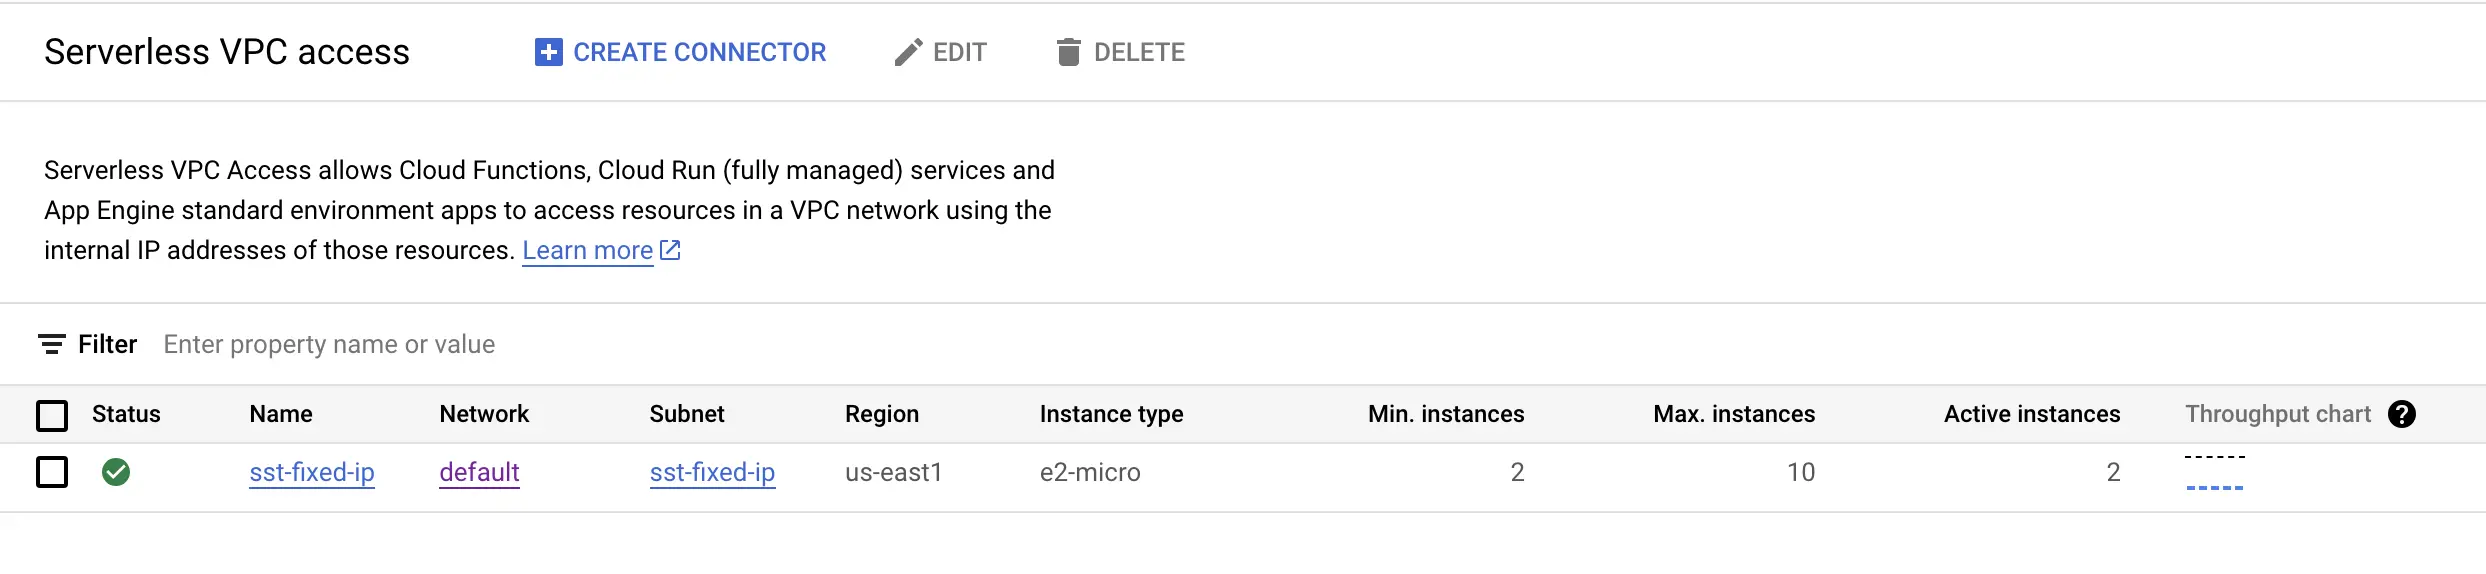
Click CREATE when ready, and then wait for the VPC connector to be created.
Step 3: Reserve the static IP address
Now, we need to reserve a new static external IP address that will be assigned to all requests through this VPC subnetwork. This is the IP address you’ll need to allowlist with your vendors.
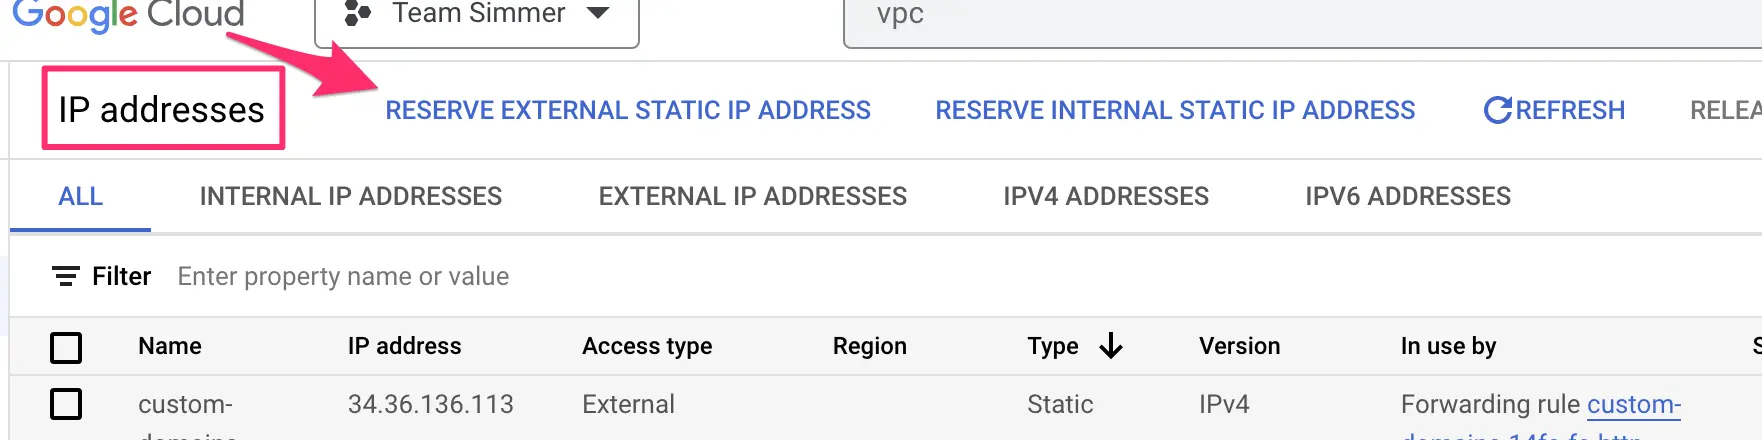
To do that, browse to IP addresses.
Here, click to reserve (an) external static IP address.
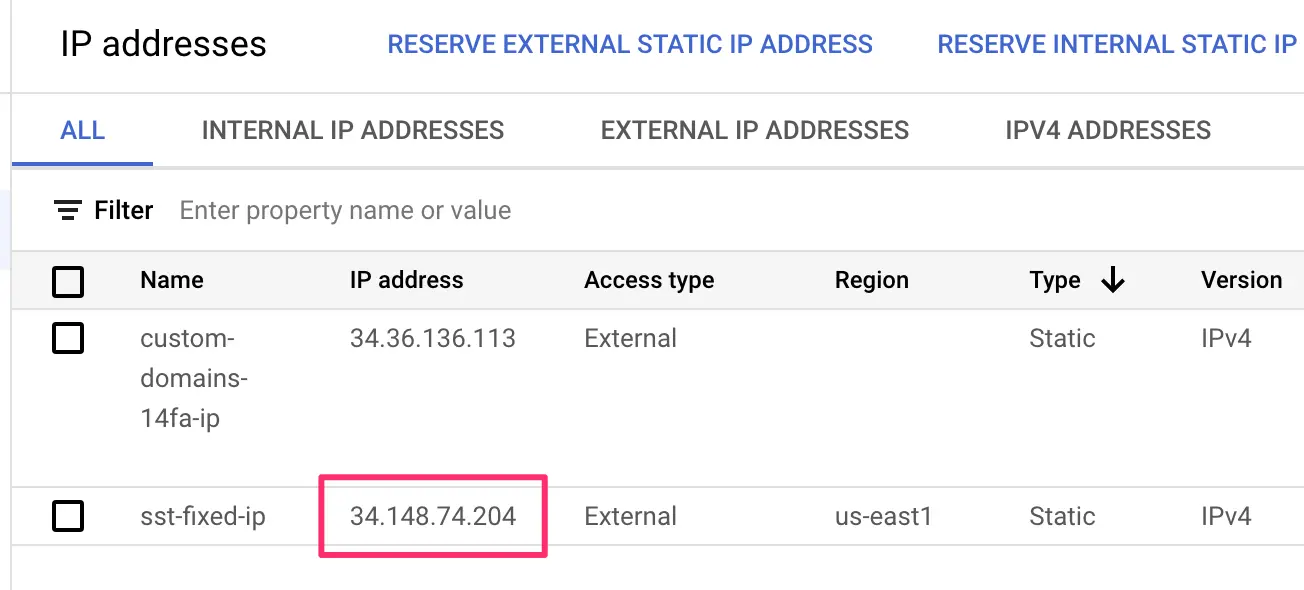
Give the IP address a name (such as sst-fixed-ip).
Make sure Regional is selected as the type, and choose the region you’ve been using for your other components (us-east1 in my case). Finally, click Reserve.
Here’s what my settings look like:

It shouldn’t take long to reserve the IP. Once it’s done, you should see what the reserved IP address is. Make a note of it for testing purposes and for allowlisting it with your vendor services.
Step 4: Create the Cloud NAT gateway
The last step of creating the VPC pipeline is to create the Cloud NAT gateway.
The purpose of this gateway is to associate the Cloud Run requests that flow through the VPC with the static IP address you created above. It’s a network address translator, in other words.
Browse to Cloud NAT and click to create a new gateway.
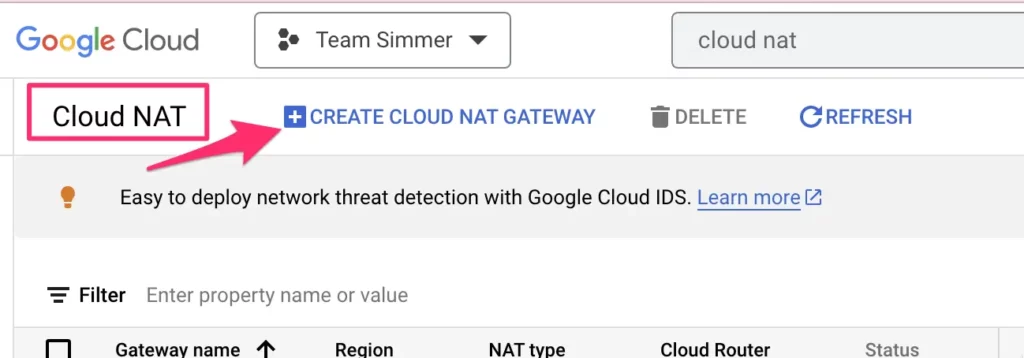
First, give the gateway a name (I’m still using sst-fixed-ip).
Next, in the Select Cloud Router list, start by choosing the Network and Region accordingly.
You should see 2 subnets when you choose the Region if you’ve been following the steps of the guide. One subnet is the default subnet created automatically in the default VPC, the other is the new, custom subnet you created for this pipeline.
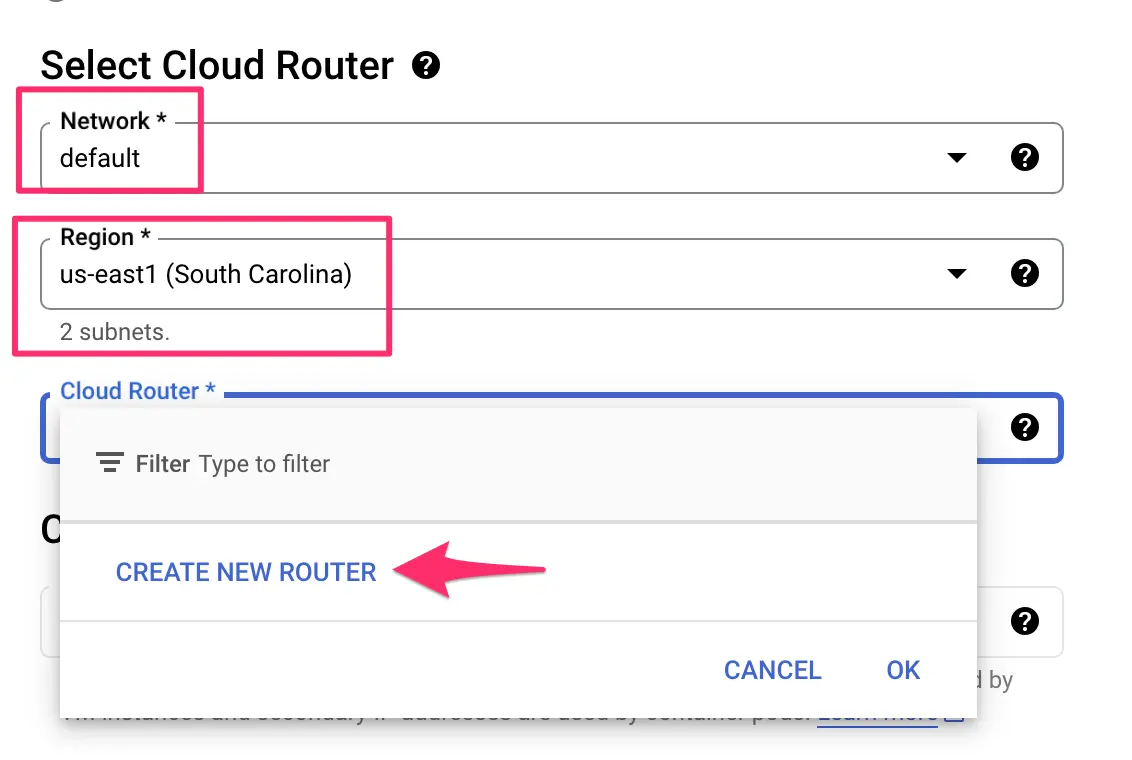
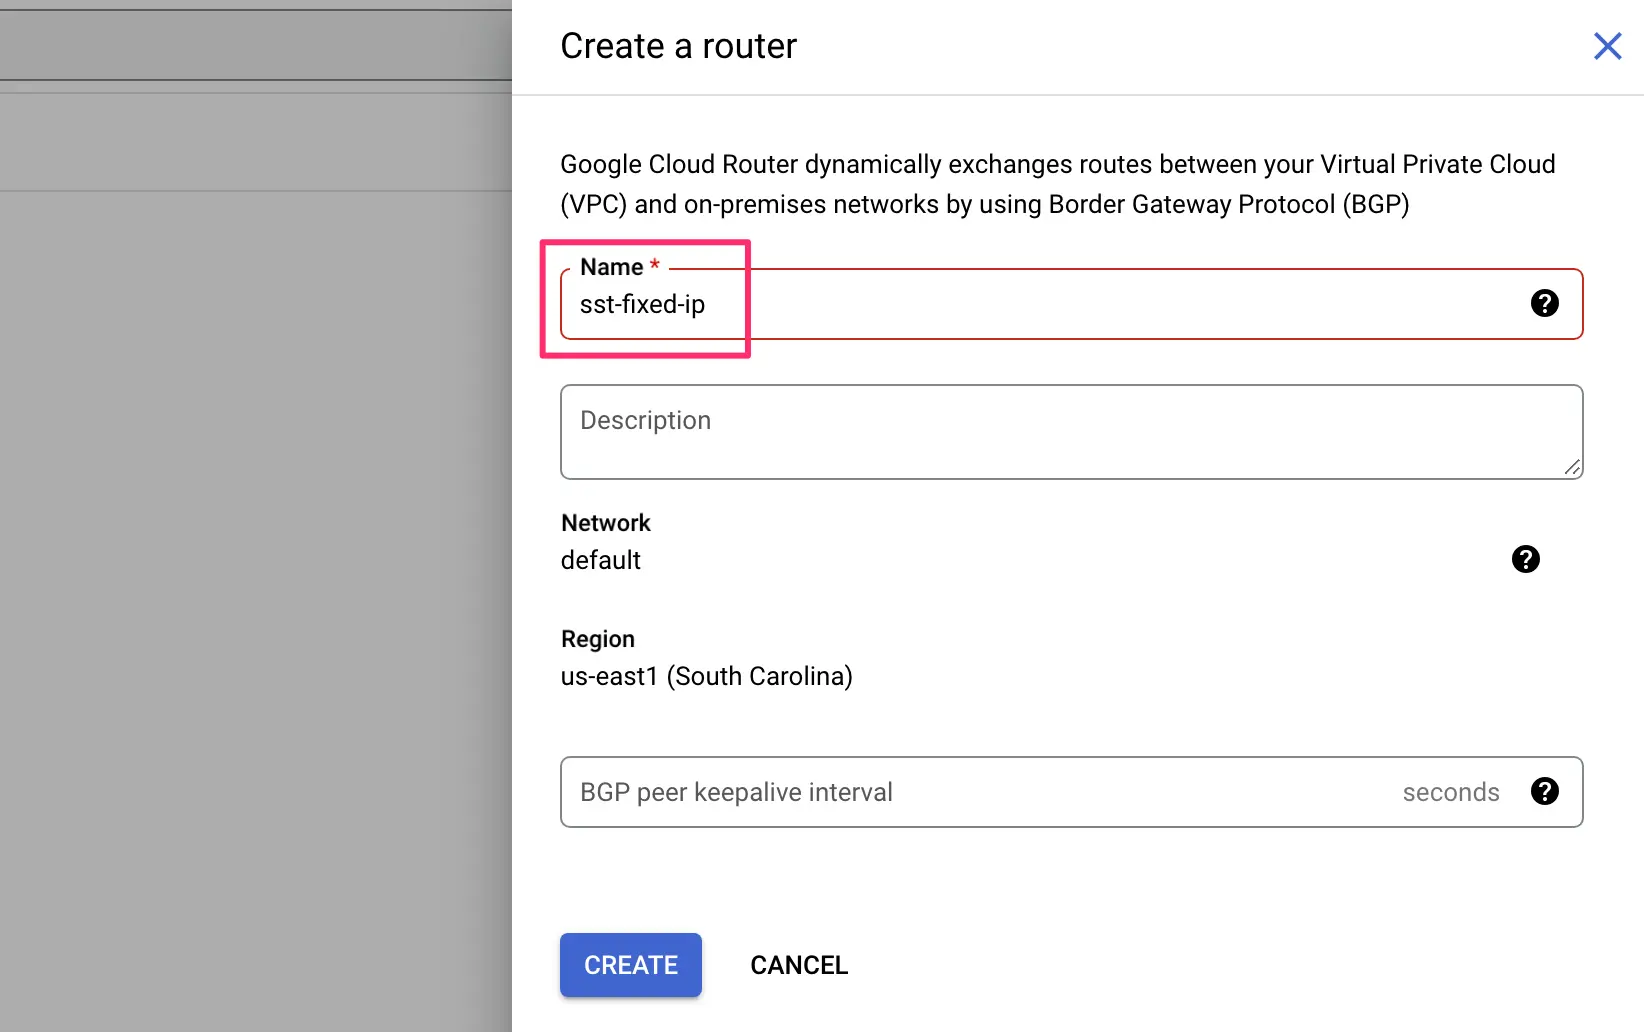
In the Cloud Router selector, click to create a new router.
Here, the only thing you’ll need to set is the name. Click Create when ready.
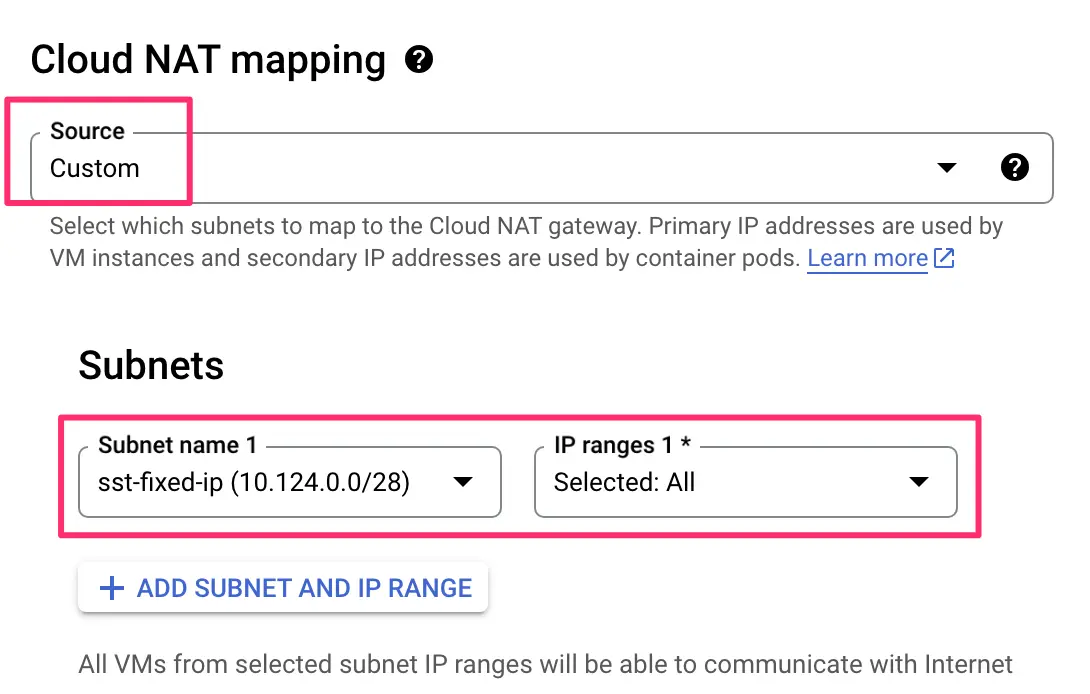
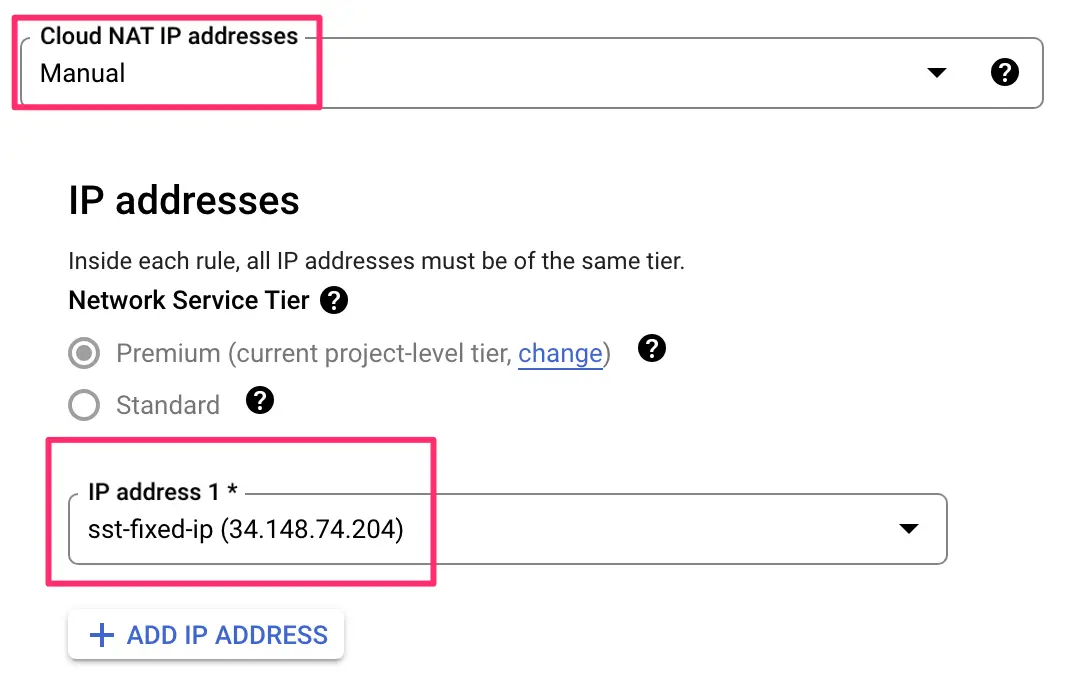
Next, in the Cloud NAT mapping section, choose Custom as the Source, find your custom subnet in the list of available subnets, and make sure all IP ranges are selected for that subnet.
This setting determines that all and only the IP addresses in the custom VPC subnetwork you created in the very beginning will be mapped with the static external IP address.
Next, select Manual from the Cloud NAT IP addresses selector, and then choose the static IP address you reserved from the list of available IP addresses.
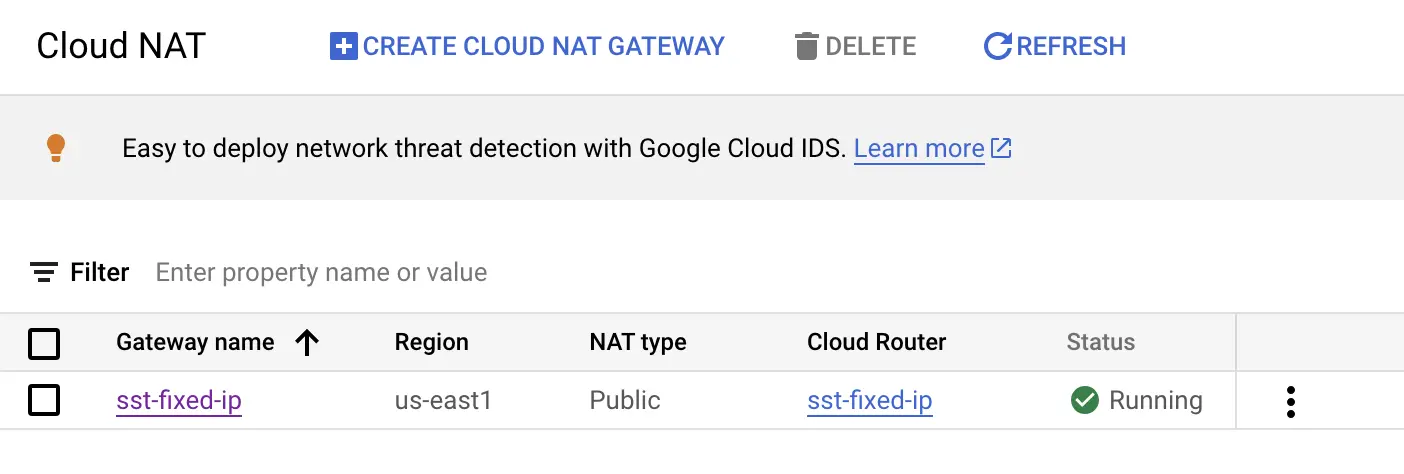
Finally, scroll down and click Create. You should now see your Cloud NAT gateway in the list:
Nice, you’re almost there! You’ve successfully created a VPC pipeline that automatically assigns all traffic through the virtual private cloud with a static external IP address.
So now we just need a service that actually forwards traffic to this VPC.
Step 5: Create a new tagging server in Cloud Run
Now, this is where it can get tricky.
In this guide, we’re creating a separate tagging server in Cloud Run. This is because we’re going to add the static IP address only to a subset of traffic to our server-side container.
It doesn’t make sense to associate the static IP address with all traffic through the server-side endpoint, because it will cost money to handle that computation with your serverless VPC connector.
Similarly, serverless VPC connectors are region-specific. If you have a multi-region setup with your tagging server cluster, you would need to create a separate VPC connector per region, and each one would come at a cost.
So in this guide, we’re creating a single new Cloud Run server, running in the us-east1 region, specifically designed to handle only the traffic that needs a static IP address.
If you haven’t worked with Cloud Run yet, I recommend starting with this guide about Cloud Run and server-side tagging in GTM. I also recommend taking a look at our Server-side Tagging In Google Tag Manager course. In this course, I walk you through setting up Cloud Run with load balancing and all.
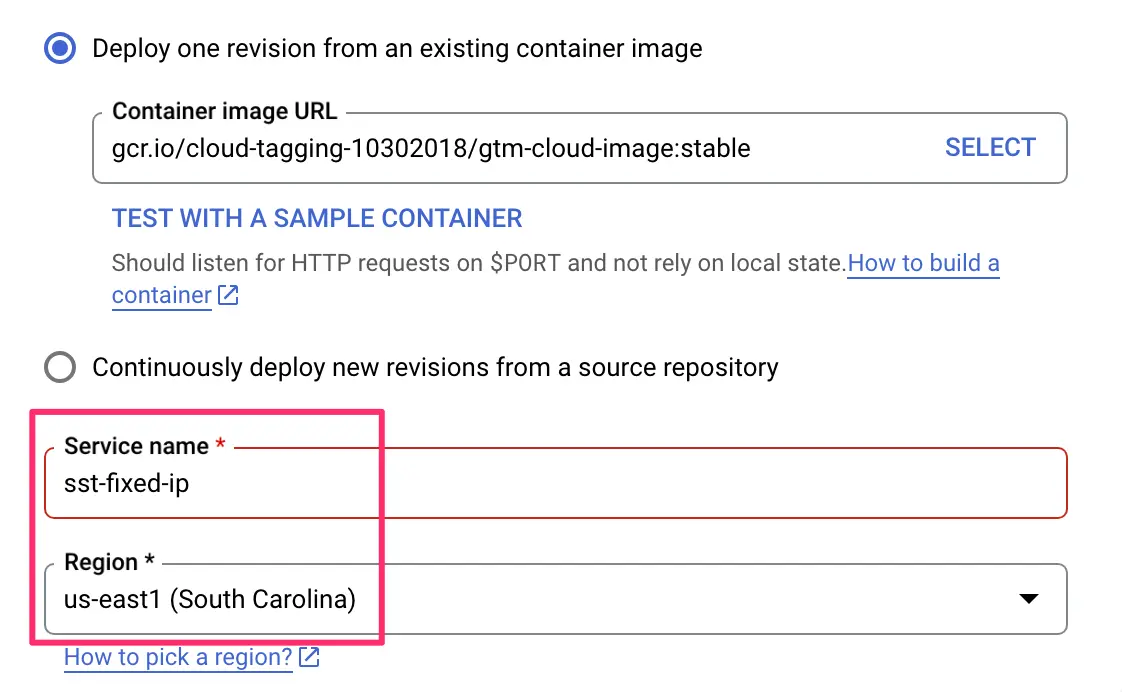
To create the new server, go to Cloud Run, select an existing tagging server, and click the copy button in the top bar.

Give the service a name (like sst-fixed-ip), and choose a region for it. Make sure the region matches the region you’ve been using in the VPC pipeline (us-east1 in my case)!
Feel free to adjust the CPU settings to your liking. You can also go with what the original service had, as you can adjust these later by deploying a new revision.
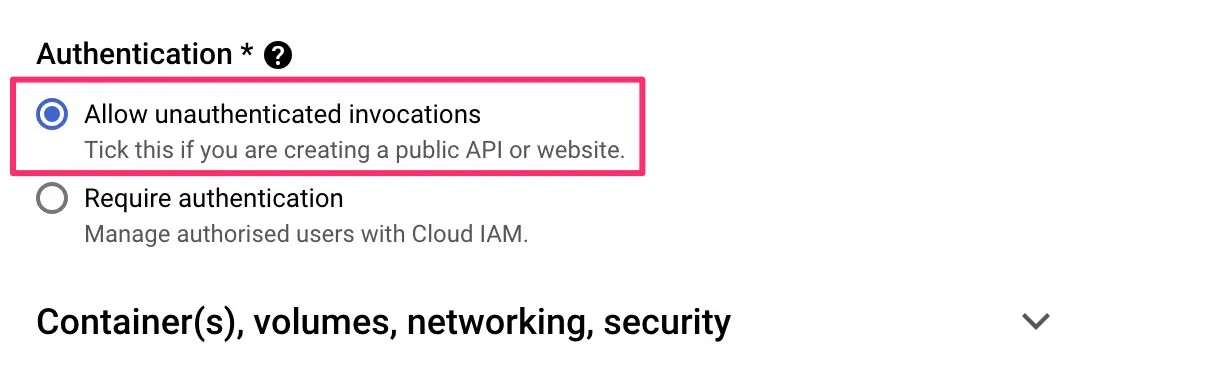
In the Authentication section, check Allow unauthenticated invocations.
Expand the settings for Container(s), volumes, networking, security, and select the Networking tab.
Here, check the box next to Connect to a VPC for outbound traffic, choose the network that has your Serverless VPC Access connector associated with it, and make sure you select Route all traffic to the VPC. Click CREATE when ready.
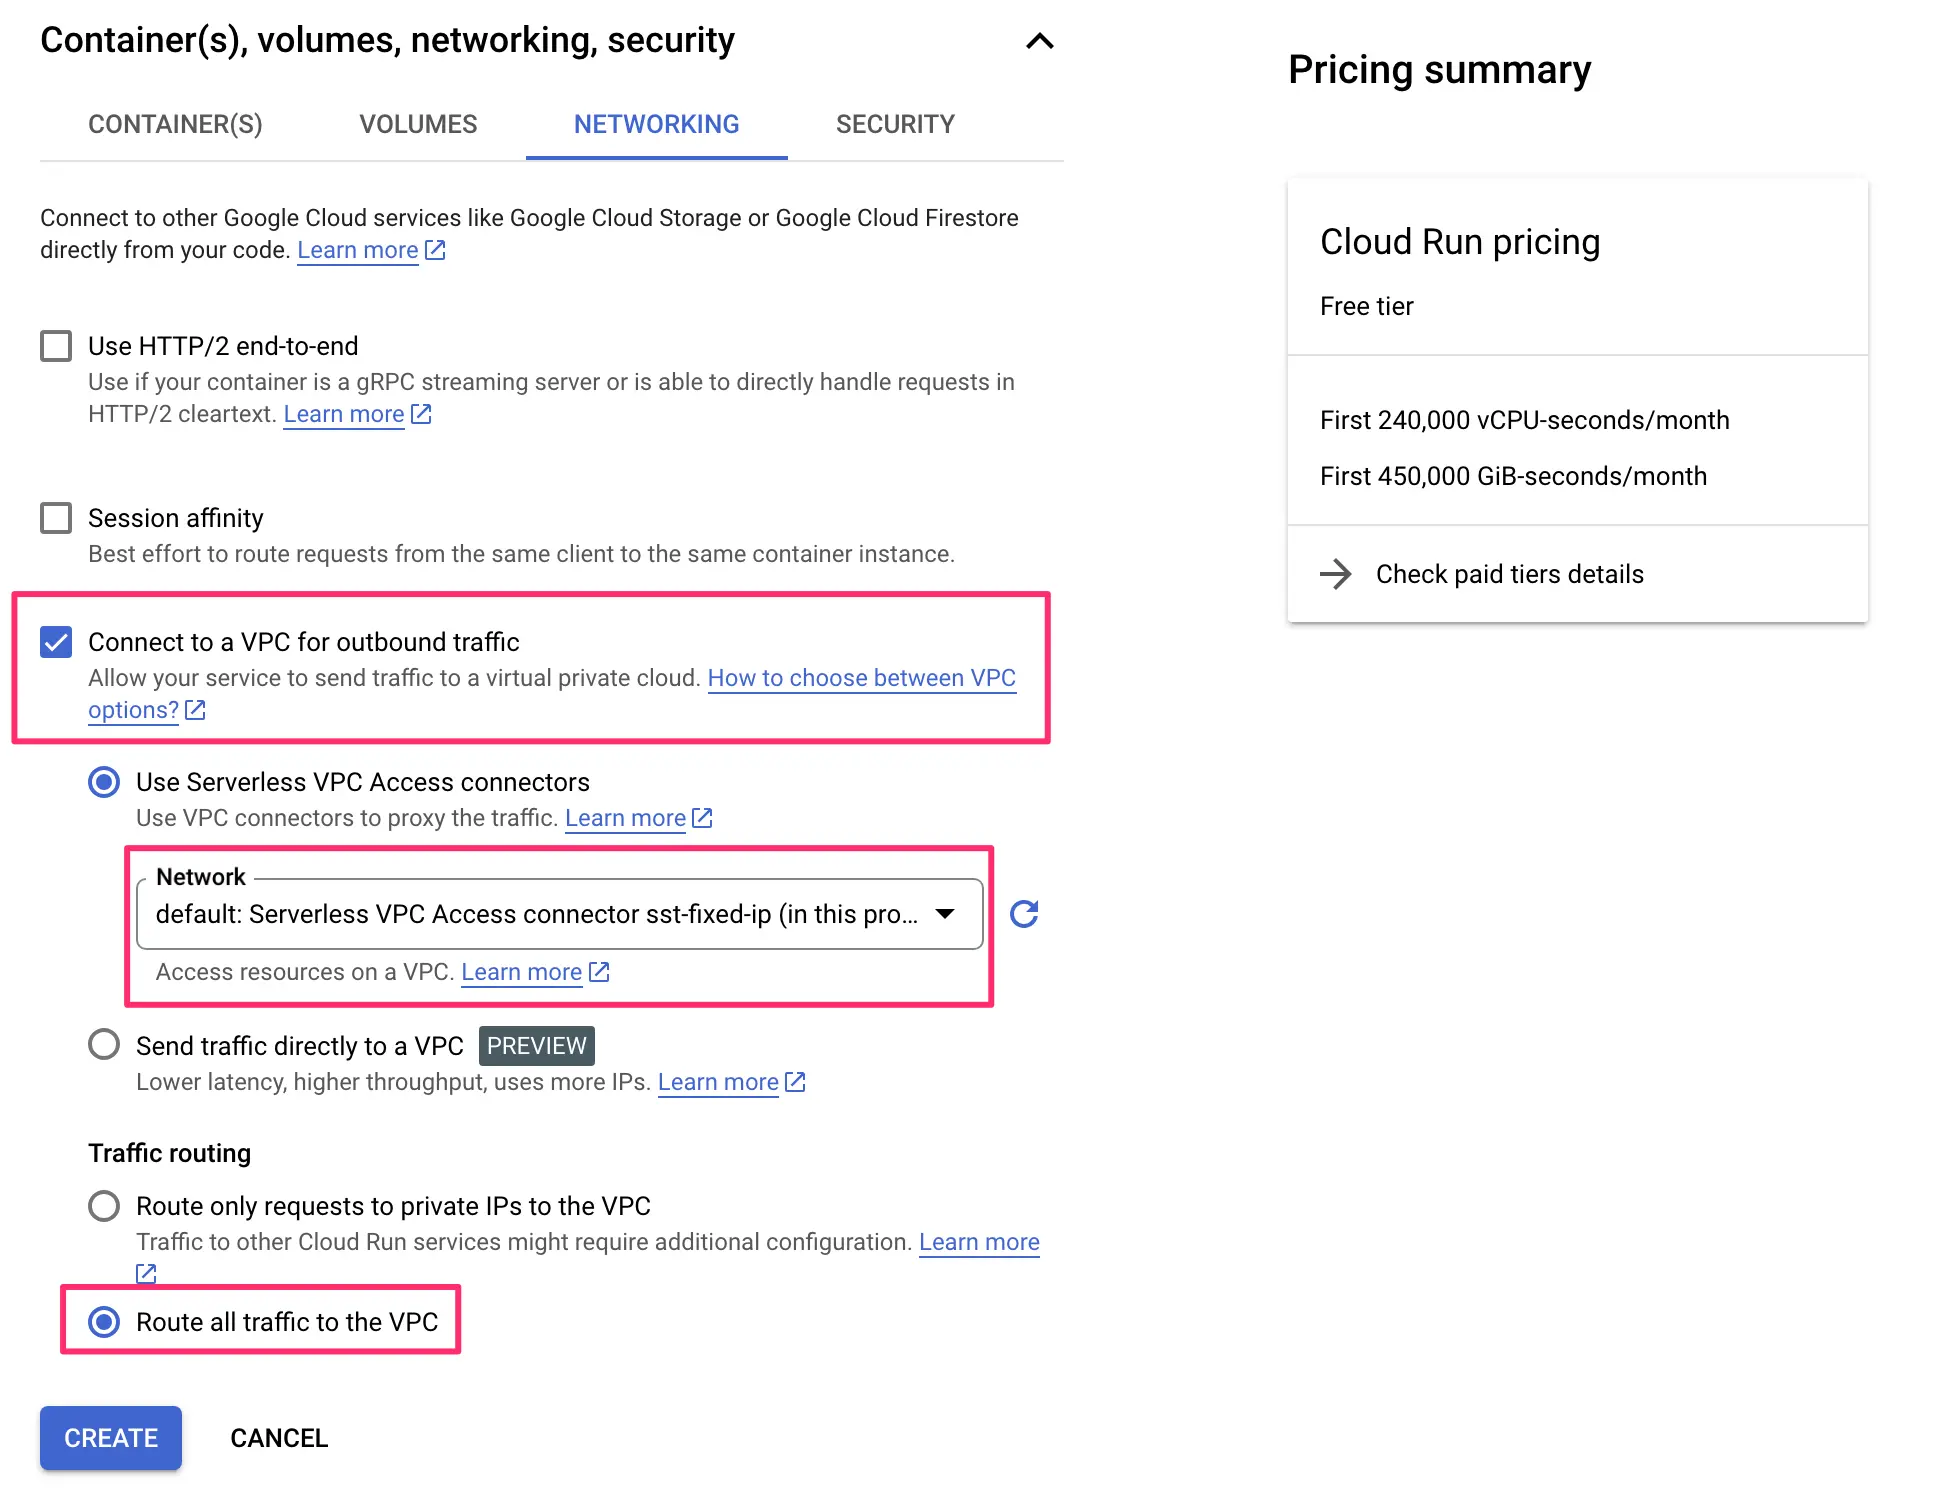
You might be wondering why you shouldn’t just use the Send traffic directly to a VPC setting, especially since it doesn’t come with the cost of maintaining the virtual machines that a serverless VPC connector requires. At the time of writing, direct VPC access does not support Cloud NAT, so that solution can’t be leveraged. Once it’s a stable release and has support for Cloud NAT, I’ll make sure to update this content accordingly.
Once ready, you should see your new tagging server in the list of available Cloud Run services.
Now the last piece of the puzzle is to make sure that the new Cloud Run server actually receives traffic to your server-side endpoint.
For this, you should already have a load balancer in place. If you don’t, the easiest way to create it is to use the Custom Domains integration with one of your existing tagging servers. You can check out this guide for steps on how to use this integration to create the load balancer.
Step 6: Modify the load balancer
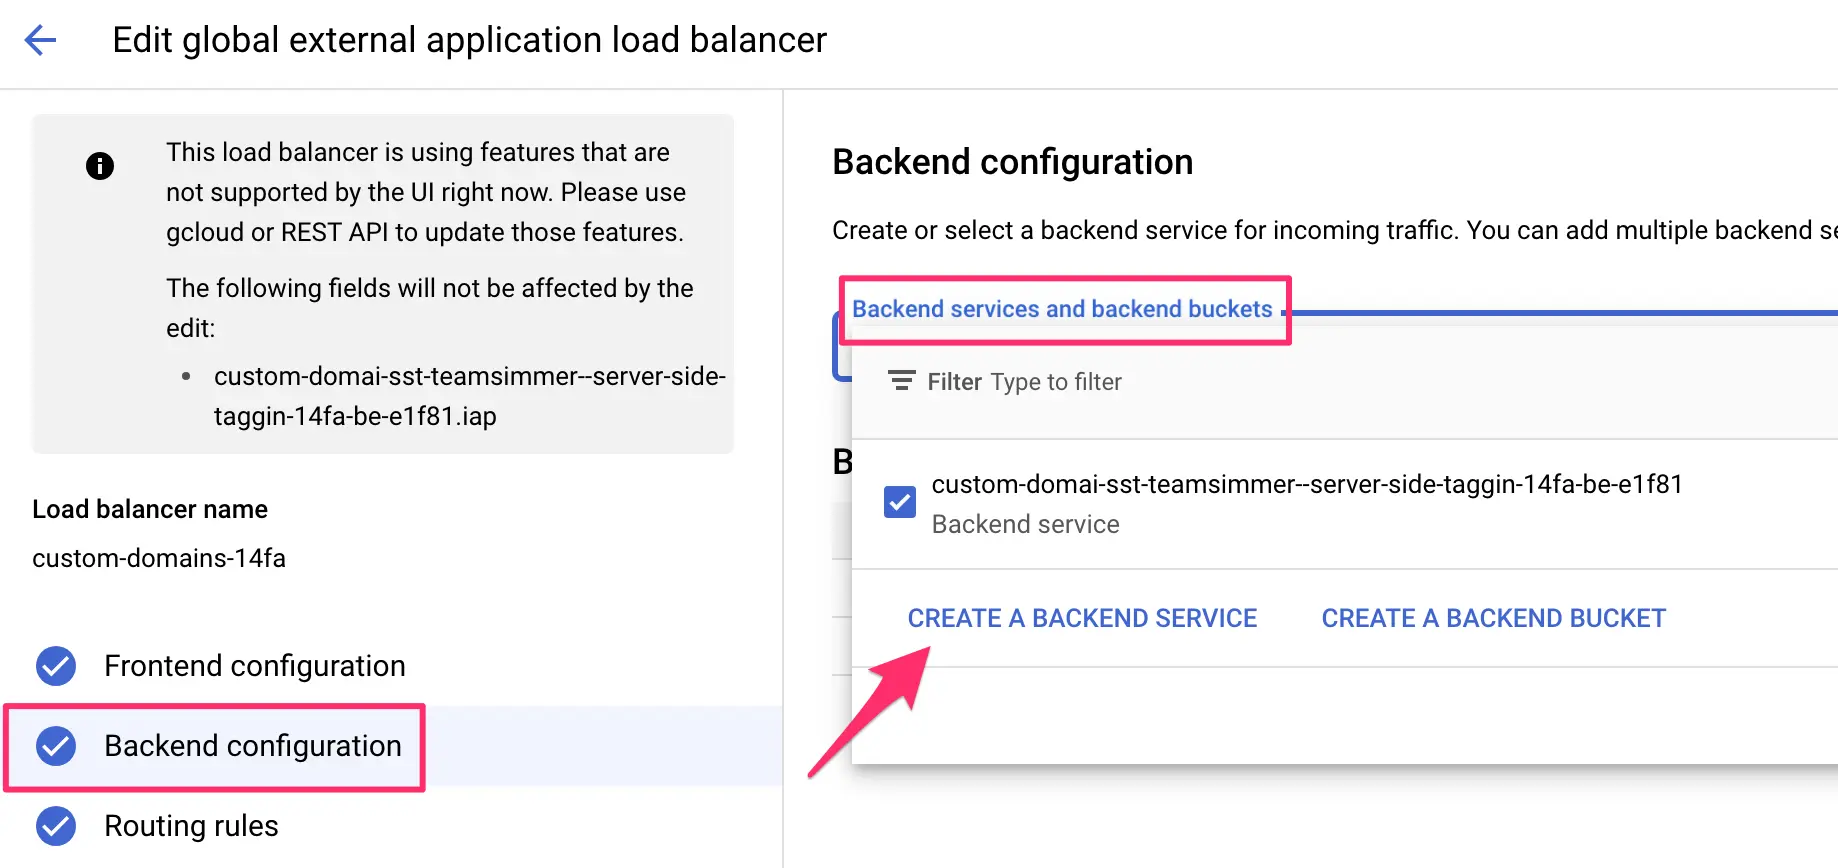
Browse to Load Balancing and click open your external application load balancer. If there’s more than one to choose from, select the one that is mapped to your existing server-side tagging Cloud Run servers.

Once it opens, click the EDIT link in the top bar.
Now, we’re going to eventually create a new routing rule, which determines that incoming HTTP requests to a certain URL path or with a certain URL parameter need to be routed to the new Cloud Run service you created above.
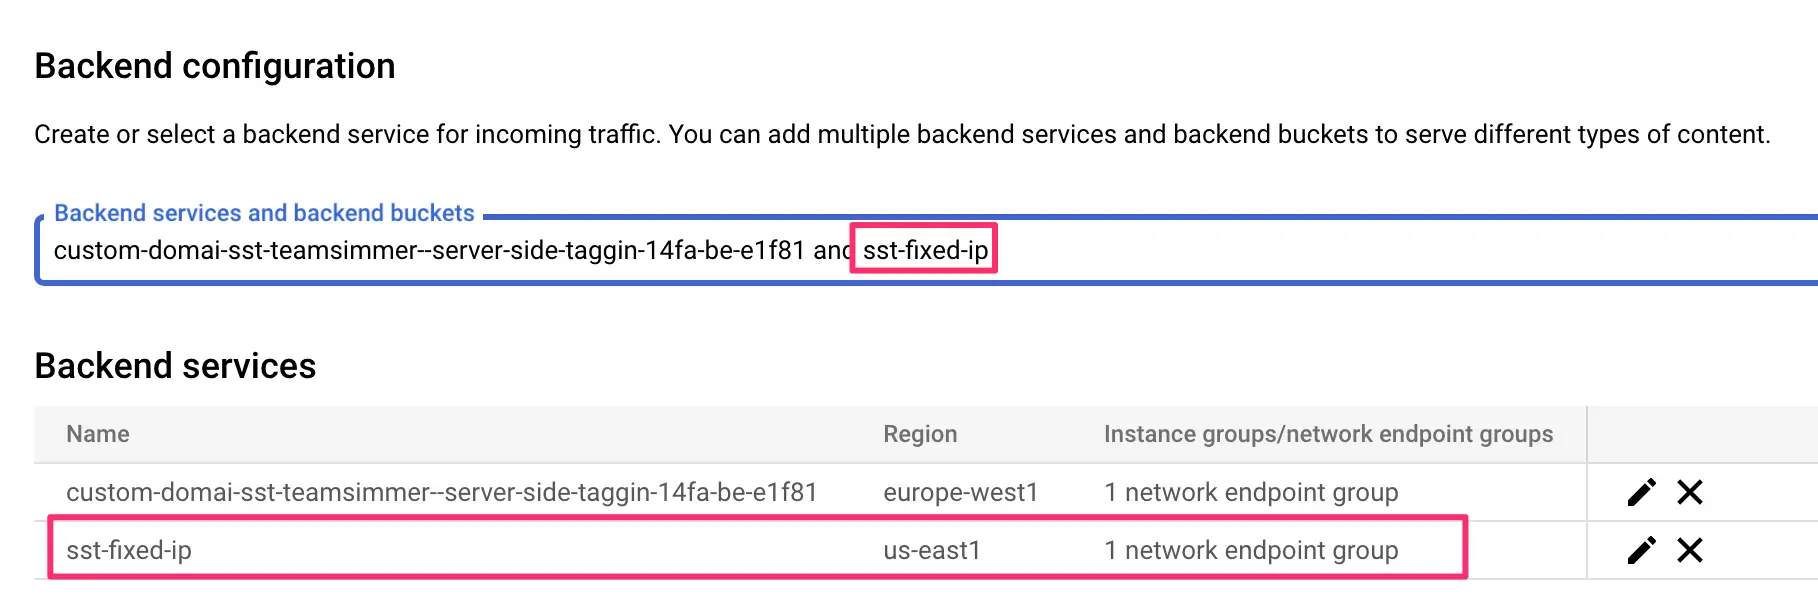
To do this, we need to create a new Backend Service, so select Backend configuration in the load balancer navigation, and from the list of Backed services and backend buckets, click to create a backend service.
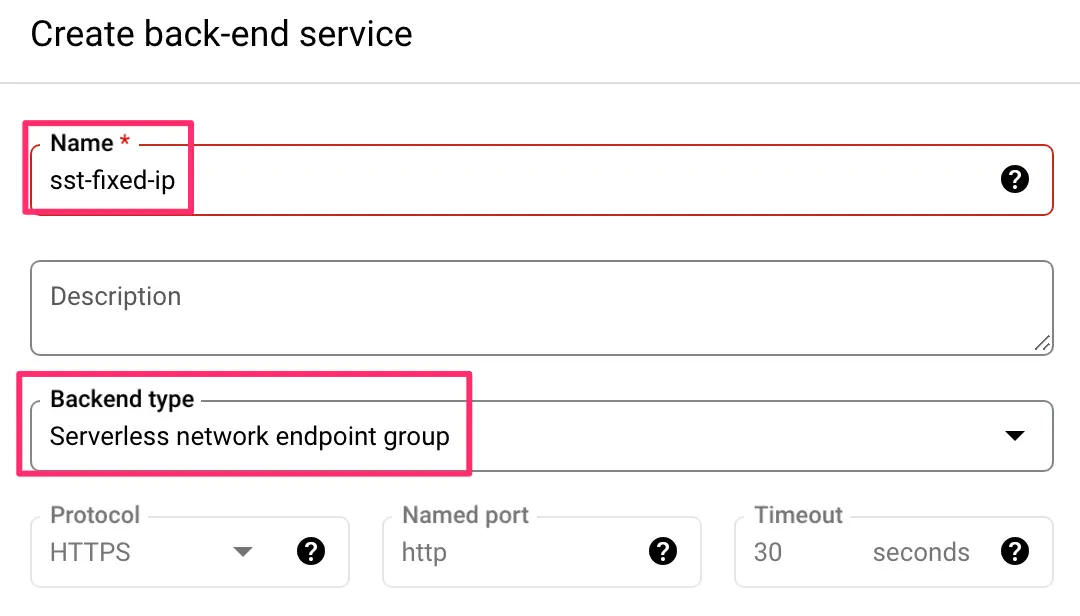
Give the service a name, and choose Serverless network endpoint group as the backend type.
Next, in the list of Backends, expand Serverless network endpoint groups and click to create serverless network endpoint group.
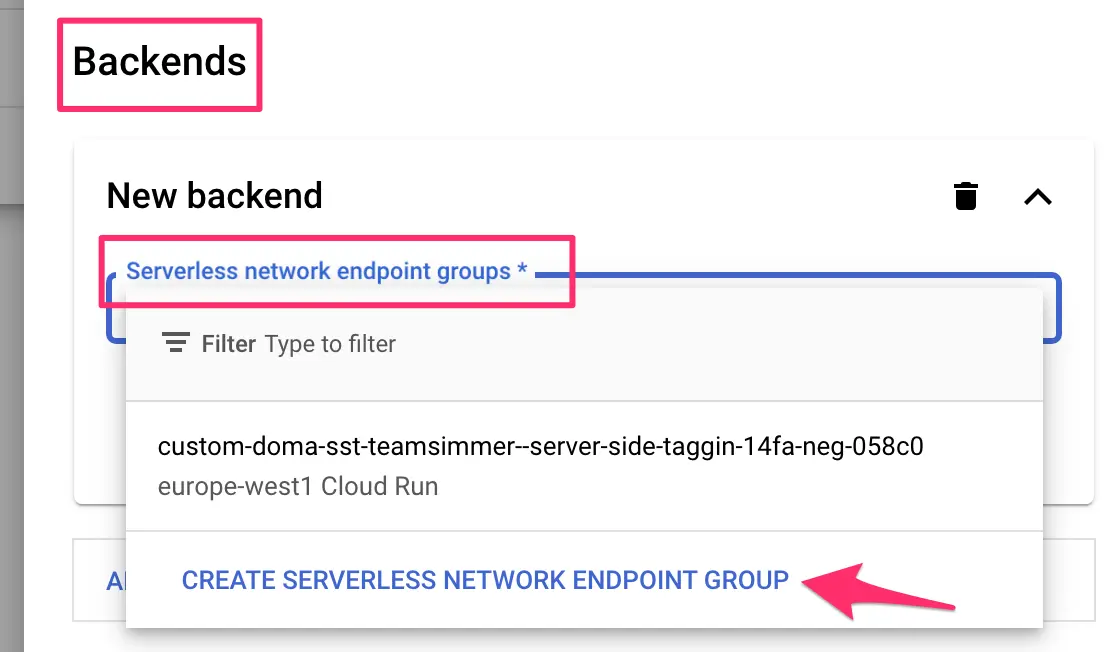
Here, give it a name (sst-fixed-ip).
Choose a region that matches the region of your new Cloud Run service.
Select Cloud Run from the NEG type, and then choose your new Cloud Run service from the Service selector. Click Create when ready.

Click Done in the list of Backends.
Uncheck Enable Cloud CDN, as you probably won’t need that for this particular pipeline.
Scroll down to Enable logging (optional but always a good idea).
Remove the Cloud Armor backend security policy unless you want the extra protections it offers.
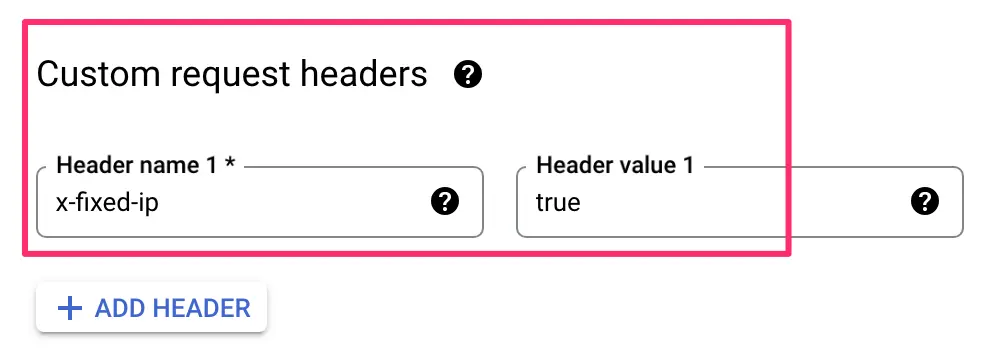
If you want, you can expand the Advanced configurations to add a Custom request header to all requests that pass through this particular backend service. It might be a good idea at least while you’re testing the pipeline.
Server-side Google Tag Manager Preview mode lets you inspect headers of incoming requests, so it’s a quick way to see if your requests are actually going through your custom static IP pipeline.
Click Create to create the backend service.
You should be back in the load balancer settings, and your new backend service should be in the list of Backend services added to the load balancer.
Just one last thing remains – we need to create a routing rule that specifies when the load balancer should forward requests through this backend service (and through your Cloud Run server and through your fixed IP VPC pipeline).
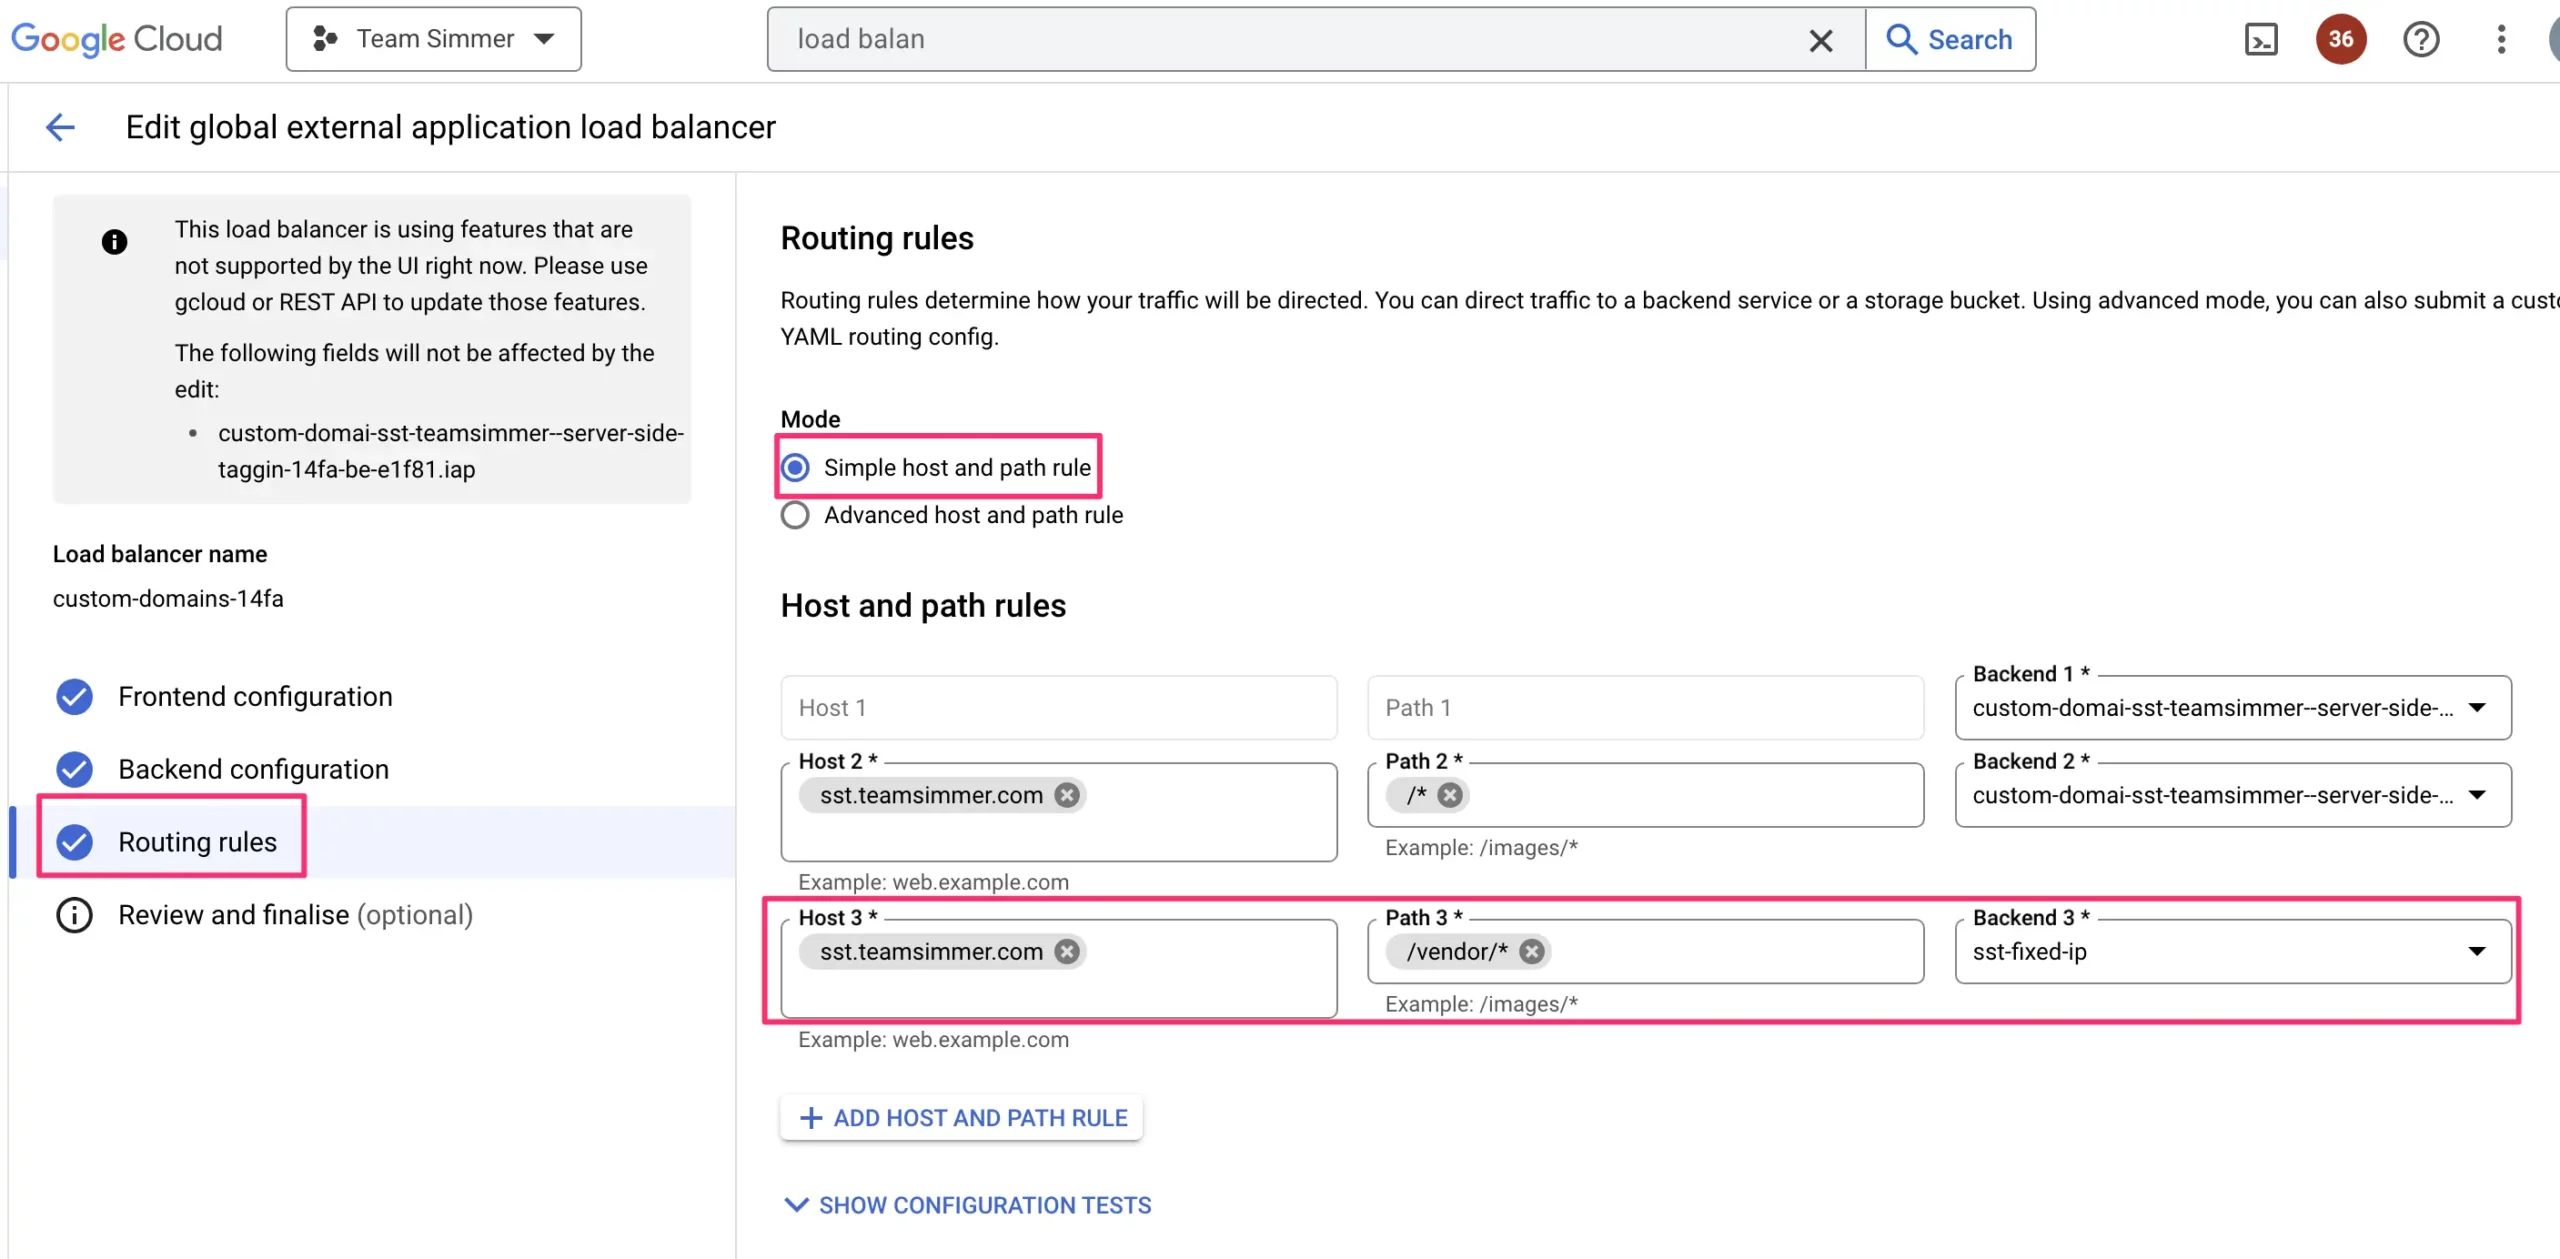
Go to Routing rules in the load balancer settings.
Here, the absolute easiest way to configure a routing rule is to use a path matcher. In this case, you can specify that all incoming requests that have a certain URL path (e.g. https://tagging.yourservergtm.com/vendor/*) will be routed to the new backend service. Here’s what that would look like:
If you want, you can select Advanced host and path rule to add more complicated logic, such as how to use a query parameter. How to configure the YAML for advanced rules is beyond the scope of this guide. However, you could use something like this to configure all requests with ?vendor=true in the URL to be forwarded to your static IP address backend service:
defaultService: projects/<your-project-id>/global/backendServices/<your-main-backend-service>
name: sst-fixed-ip
routeRules:
- matchRules:
  - queryParameterMatches:
    - exactMatch: 'true'
      name: vendor
    prefixMatch: /
  priority: 1
  service: projects/<your-project-id>/global/backendServices/<your-static-ip-backend-service>
- matchRules:
  - prefixMatch: /
  priority: 2
  service: projects/<your-project-id>/global/backendServices/<your-main-backend-service>
In any case, choose whichever approach works best. Remember that you still need a Client in the server-side GTM container to capture these requests, so make sure you utilize a path or query parameter rule that is claimed by a client in the Server container.
For example, the Stape Data Client is a great way of ingesting data into the container. By default, it uses the path /data/, so you could create a path rule for that particular path following the steps above.
Once you’re done with the routing rules, click UPDATE to update the load balancer.
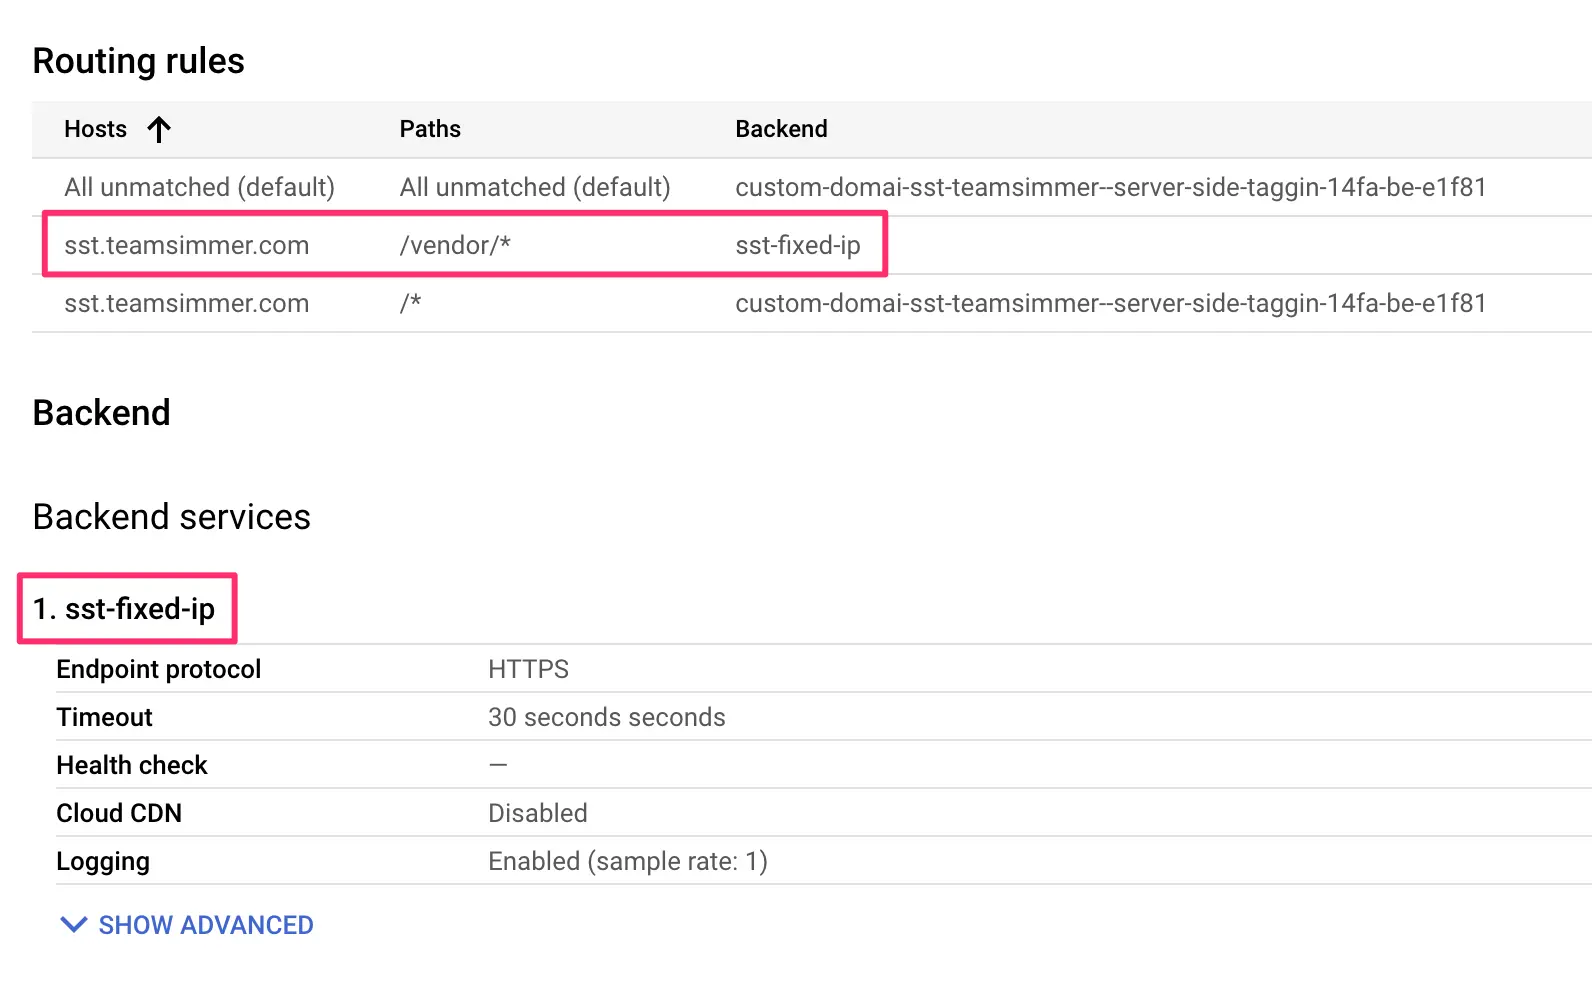
If all goes well, you should now see a new routing rule and a new backend service in the load balancer overview.
Step 7: Test!
Here’s what you have now:
- A load balancer forwards all traffic to the path /vendor/ to a new backend service.
- This backend service is linked to a new Cloud Run server running in us-east1.
- All traffic to this Cloud Run server is forwarded to a VPC also running in us-east1.
- All traffic to this VPC subnetwork will be mapped to a Cloud NAT gateway.
- The Cloud NAT gateway assigns a static external IP address to all this traffic.
To test, you can import this GTM client template into your container, and then create a new client with it.
The client uses https://curlmyip.org/ to log the IP address of the outgoing request.
If all works as it should, all requests to /vendor/ should be logged with the static IP address you reserved. All other requests should use the regular IP address pool.
Open Preview mode in your server container.
First, test by sending a request to any random path of the server-side tagging endpoint just to verify that it does not get the static IP. You can also check the incoming request headers to double-check the request does not have the request header you (optionally) configured for your backend service in the load balancer settings above.
Next, test by navigating to the /vendor/ path (or whatever you reserved in the load balancer’s routing rules). First, check if the incoming request has the custom header:
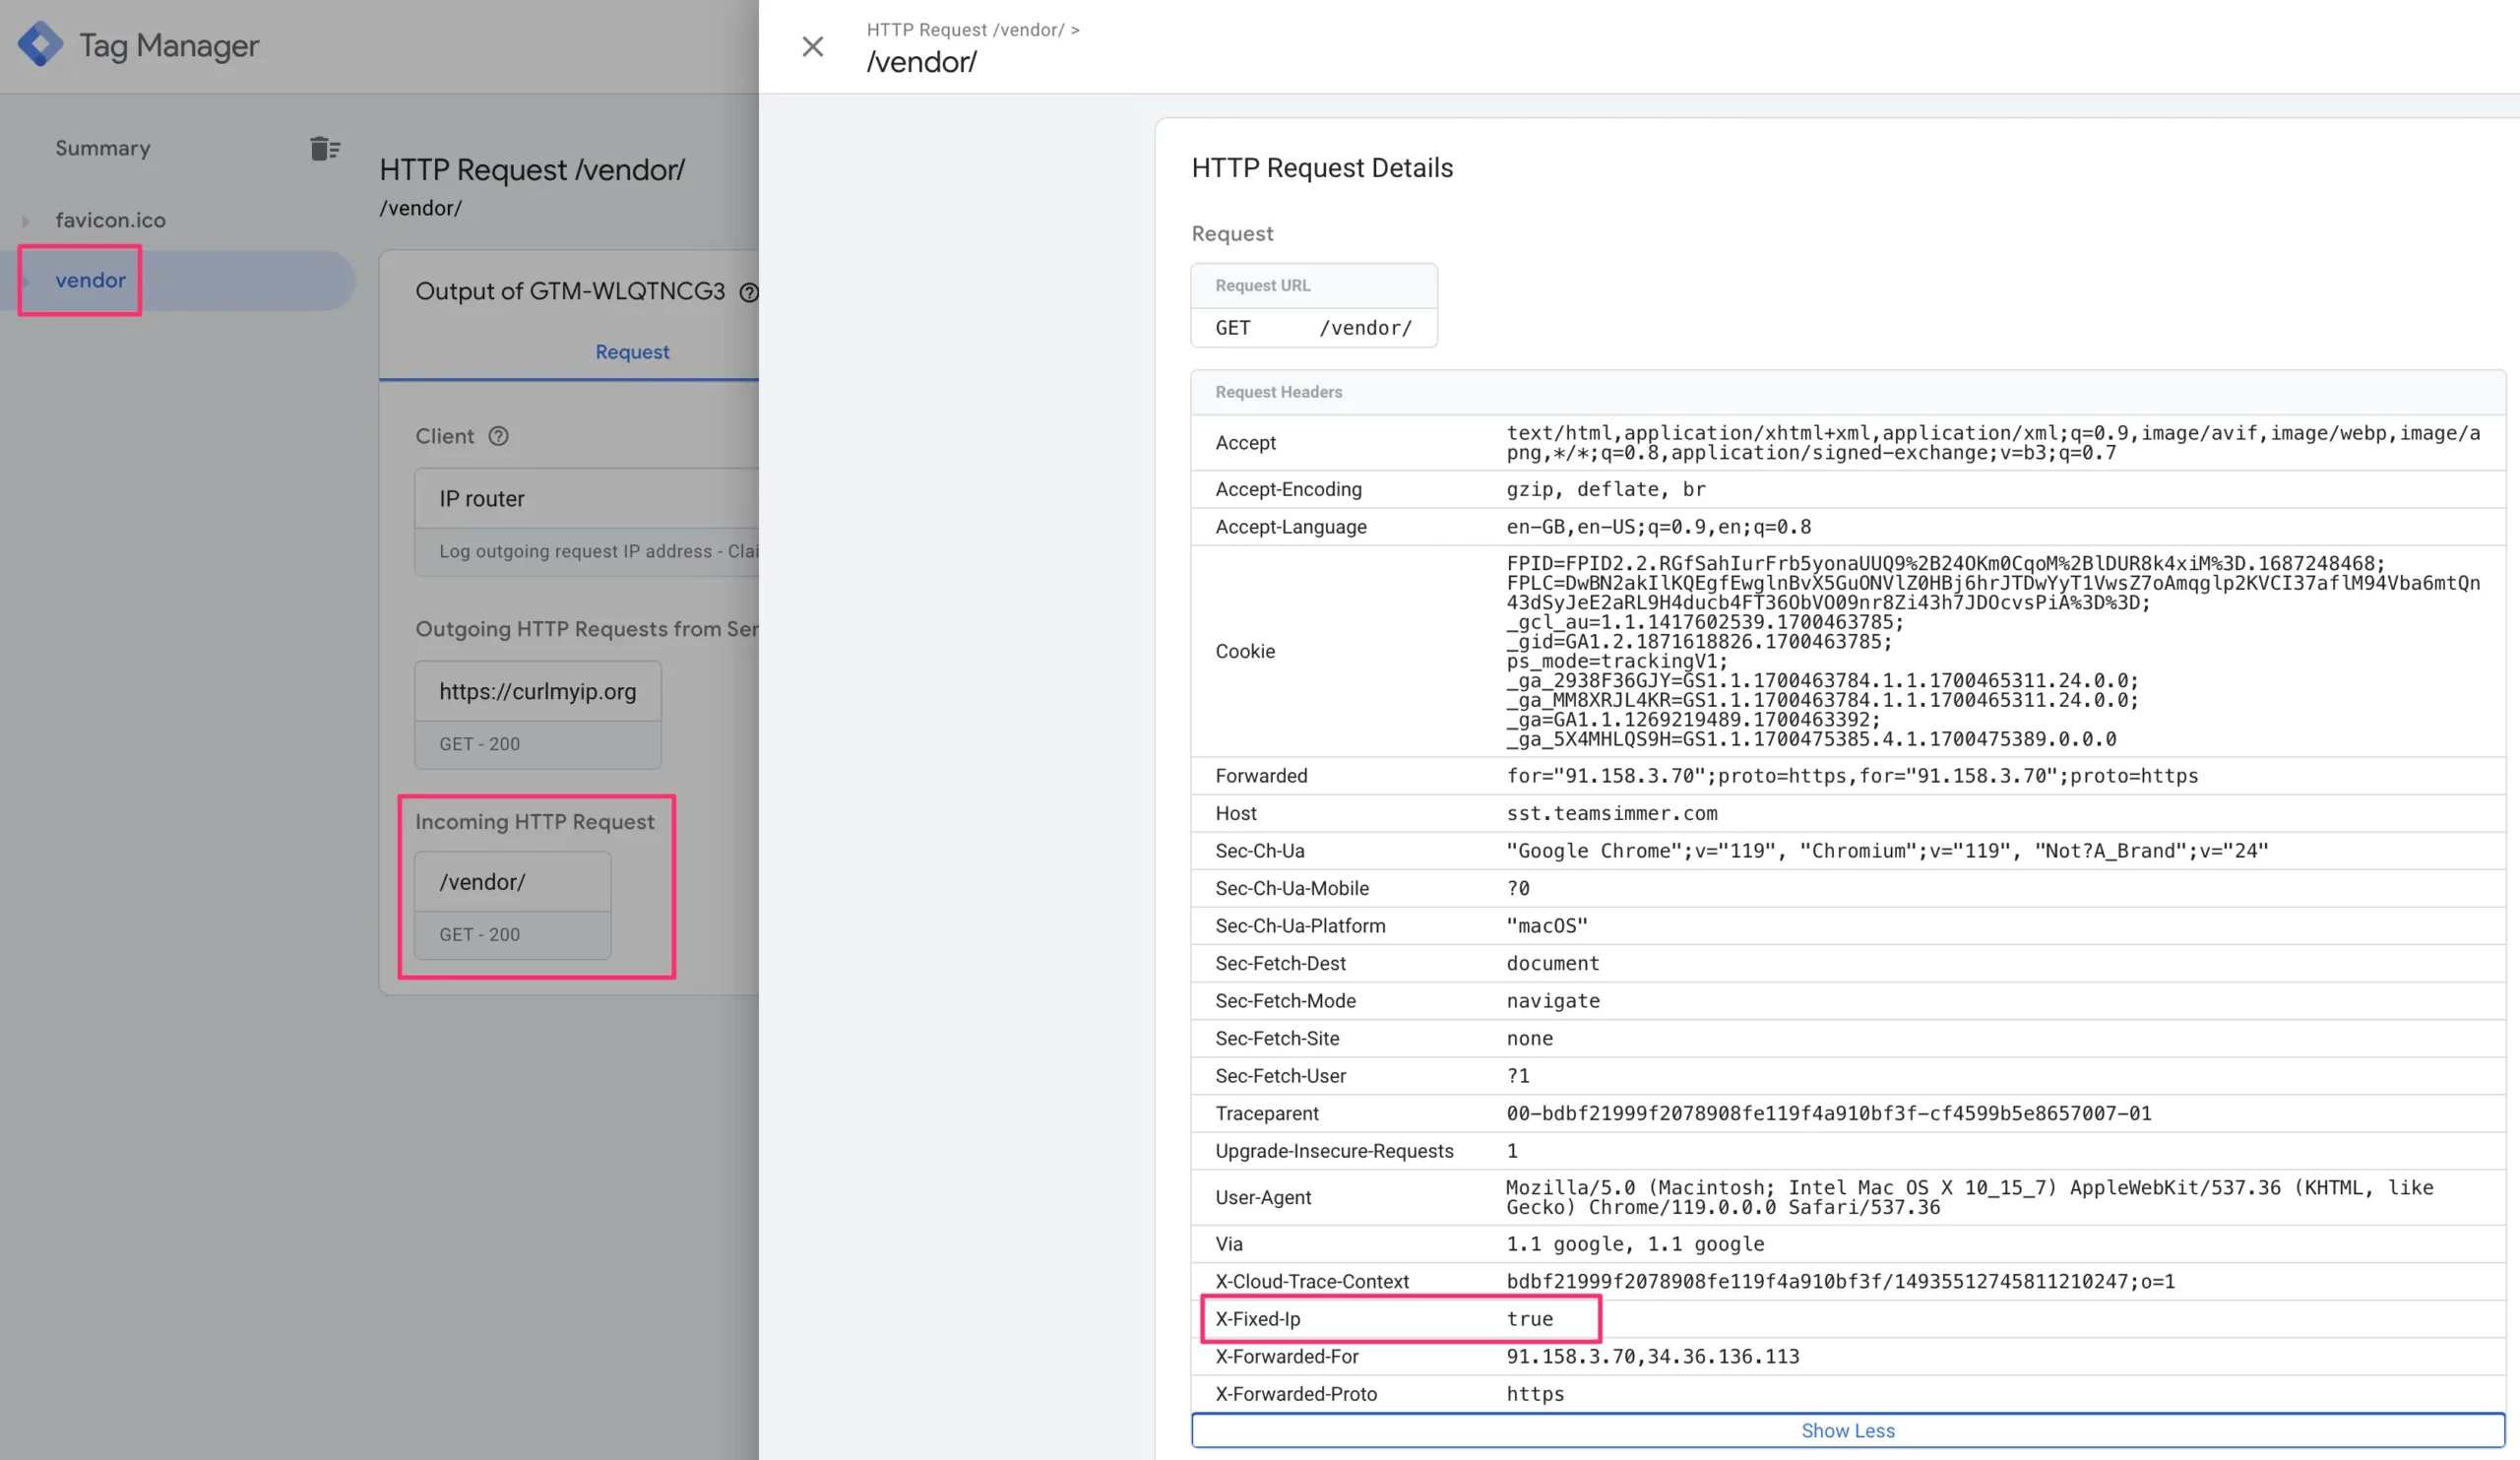
Finally, check the Console tab to see what curlmyip.org writes into the console. The IP address in the body field should match the static IP address you reserved in the Google Cloud Platform.

If you don’t see the header or the IP address logged, the problem is most likely in your Load Balancer settings, so review them again.
Summary
This wasn’t an easy walkthrough – VPC networking is hard.
It’s one of the most complicated topics about serverless cloud services, in my opinion.
Luckily, you don’t really need to use it except if you run into a use case like the one in this article.
I don’t like the notion of assigning static IP addresses to cloud egress traffic – one of the benefits of using a serverless stack like Cloud Run is that you don’t have to worry about figuring out the networking stuff.
On top of that, the static IP address might end up costing quite a bit of money, if the serverless VPC connector needs to pass through a lot of traffic.
Hopefully, Cloud Run’s direct VPC access is out of preview soon, supports Cloud NAT, and works with more cloud regions. At that point, setting up the static IP address will be considerably cheaper as you no longer need the virtual machines of the serverless connector.
Until then, you need to work with this slightly more complicated, considerably more expensive approach.
Let me know in the comments if you have questions about this setup!