
The question we’re going to be looking at today is inspired by our course, JavaScript For Digital Marketers.
How do I add my own listener to the dataLayer.push() method without disrupting how Google Tag Manager works?
You probably knew that dataLayer is what Google Tag Manager uses as a repository of information on the page, but did you know that GTM doesn’t actually use the array itself?
When GTM is loaded on the page, it attaches a listener to the dataLayer.push method. This listener copies all the key-value pairs in each method call and stores them in Google Tag Manager’s internal data model.
This data model is Google Tag Manager’s soul. It’s used to fuel data layer variables, GTM’s built-in triggers, and all sorts of internal mechanisms.
For this reason, it’s important that the dataLayer.push method is never disrupted – otherwise you’ll risk breaking Google Tag Manager on the page.
In this article, I’ll show you how and why you might still want to override the dataLayer.push method with your own modifications. I’ll share with you the pattern you should use to make sure you don’t break GTM in the process.
Video walkthrough
If you prefer this walkthrough in video format, you can check out the video below.
Don’t forget to subscribe to the Simmer YouTube channel for more content like this.

The dataLayer vs. Google Tag Manager’s Data Layer
Google Tag Manager isn’t actually that concerned about the dataLayer array. The only time where it’s relevant that it’s an array is when Google Tag Manager is first loaded.
Upon initial load, GTM will traverse the array from the first item to the last item, and process each in order (first in, first out). When Google Tag Manager loads, it attaches a listener to the dataLayer.push method. From that moment onwards, GTM will intercept each item that is pushed into dataLayer and process the key-value pairs into its data model.
But what is this “processing”, and what is this “internal data model”?
Google Tag Manager’s Data Layer is essentially a big lookup table comprising key-value pairs. When an object is pushed into dataLayer, GTM parses each key-value pair into its own Data Layer.
// BEFORE: Google Tag Manager's Data Layer
{}
// First push
window.dataLayer.push({
  event: 'init',
  page: 'Home',
  user: {
    state: 'logout',
    id: null
  }
});
// GTM's Data Layer after this first push
{
  event: 'init',
  page: 'Home',
  user: {
    state: 'logout',
    id: null
  }
}
As you can see, the data model merges the key-value pairs from each individual push, and it persists them internally until the page is unloaded.
You can now see how detrimental it is if dataLayer.push is overwritten so that GTM’s listener no longer works.
But what if you do want to add your own logic to dataLayer.push? Read on.
Override dataLayer.push safely
To override the dataLayer.push method safely, you can use this pattern:
(function() {
  window.dataLayer = window.dataLayer || [];
  var oldPush = window.dataLayer.push;
  window.dataLayer.push = function() {
    var states = [].slice.call(arguments, 0);
    // Your modifications
    return oldPush.apply(window.dataLayer, states);
  };
})();
Lines 1 and 11 wrap the entire code block in an IIFE (immediately invoked function expression). This is one of my favorite patterns to use whenever I need to set variables without having to worry about them messing with the global scope.
Line 2 initializes the window.dataLayer property as an array, unless it’s already been initialized. This is again a good practice to use whenever running dataLayer-related code outside Google Tag Manager.
On line 3, we copy a reference to window.dataLayer.push in a local variable named oldPush. The significance of this will be apparent once we reach line 9.
Line 4 begins our actual override. Here, we replace the window.dataLayer.push method with our own function expression.
On line 5, we create an array out of the arguments that were passed to window.dataLayer.push. Typically, this would be the object that was pushed into dataLayer, but it could also be multiple objects, an array, a function, or something completely different.
On line 7, I’ve left a placeholder to indicate where you can add your own modifications to the function.
Line 9, together with line 3, is absolutely crucial. By passing the states array to the previous window.dataLayer.push reference (stored in the oldPush variable), we make sure that our override doesn’t become an overwrite.
The code on line 9 basically ensures that Google Tag Manager (or any other tool that has attached a listener to dataLayer.push) will be able to process the arguments to the call, too.
Use case #1: Log the push to console
The first use case is a very simple side effect. Anytime something is pushed to dataLayer, we want to log that information into the JavaScript console for debugging reasons.
You could just as well replace the console.log with something more complicated, such as an HTTP request to your own logging endpoint or something.
(function() {
  window.dataLayer = window.dataLayer || [];
  var oldPush = window.dataLayer.push;
  window.dataLayer.push = function() {
    var states = [].slice.call(arguments, 0);
    // Use case #1: Log what was pushed
    console.log(states);
    return oldPush.apply(window.dataLayer, states);
  };
})();
The console shows an array of the objects that were included in the dataLayer.push call. Typically this would just be a single plain object, as in the screenshot above.
You might wonder where gtm.uniqueEventId comes from, as it wasn’t part of the dataLayer.push – well, this is actually a modification done by Google Tag Manager once it receives the object through its own dataLayer.push listener. The modifications show up in the console.log due to timing reasons (the console.log output is rendered after GTM makes its modifications).
Use case #2: Modify the state object(s)
This second use case can have a lot of utility. Instead of just reading what was pushed to dataLayer, you can also modify the object(s) dynamically. This is exactly what GTM did above when it added the gtm.uniqueEventId to the object.
In this example, we’ll add a custom timestamp (in UNIX time). You can use this information to calculate the time delta between two dataLayer.push calls, for example, or how long it took for a dataLayer.push to happen after the page render began.
(function() {
  window.dataLayer = window.dataLayer || [];
  var oldPush = window.dataLayer.push;
  window.dataLayer.push = function() {
    var states = [].slice.call(arguments, 0);
    // Use case #2: Modify the state object(s)
    states.forEach(function(state) {
      state.custom_timestamp = new Date().getTime();
    });
    return oldPush.apply(window.dataLayer, states);
  };
})();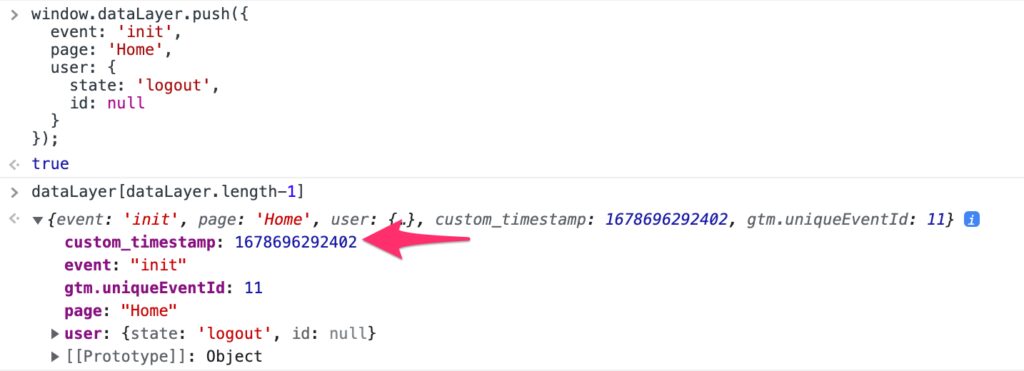
In the screenshot you can see how the custom_timestamp key-value pair was dynamically added to the object even though it wasn’t part of the dataLayer.push call.
This dynamically added key is also added to GTM’s Data Layer (because the entire modified states object is passed to it on line 12, remember?).
Furthermore, because pretty much all of GTM’s dynamic and built-in mechanisms leverage dataLayer (all the built-in triggers, for example), this information is also added to dataLayer.push calls that originate from GTM’s internal mechanisms.
Use case #3: Log the computed state of GTM’s data model
This last use case I’ll share with you is perhaps more of a curiosity, but it might be valuable in some debugging scenarios, too.
After every dataLayer.push call, the most recent, computed state of GTM’s Data Layer is printed in the console.
This is a great way to learn how GTM’s data model works. It mimics GTM’s Preview Mode in that it allows you to inspect the state of Data Layer after every dataLayer.push.
(function() {
  window.dataLayer = window.dataLayer || [];
  var oldPush = window.dataLayer.push;
  window.dataLayer.push = function() {
    var states = [].slice.call(arguments, 0);
    // Use case #3 Log the computed state of GTM's data model
    var containerId = 'GTM-XXXXXX';
    var dataModel = window.google_tag_manager[containerId].dataLayer.get({
      split: function() { return []; }
    });
    // Need to apply the changes first
    var appliedPush = oldPush.apply(window.dataLayer, states);
    // Then log the data model
    console.log(dataModel);
    // And finally return the applied change result
    return appliedPush;
  };
})();
In this example, we’ll move things around a little to get the timing right. Basically, we need to apply the changes to the data model first (by running the oldPush.apply call) before logging the result.
Note that the console.log call would probably work regardless because of similar timing considerations as with the first use case, but in case you want to run any custom logic with the computed state, the order of things might be significant.
The actual “trick” here utilizes an unofficial, undocumented way of capturing the computed state. I’ve written about it previously in my personal blog. You need to replace the containerId value on line 8 with the GTM container ID whose data model you wish to access on the page.
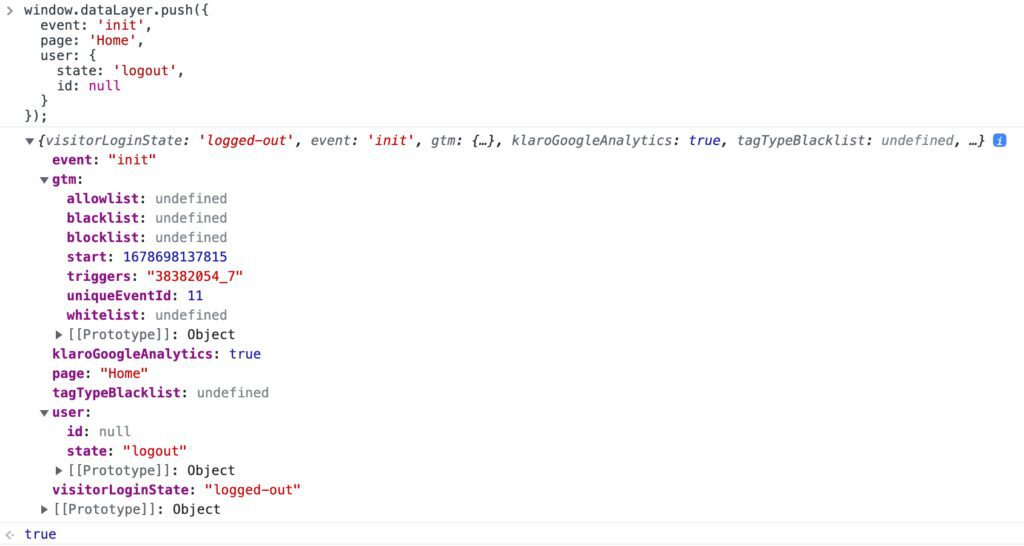
As you can see, the computed state includes a bunch of keys and values that might look completely alien. These are internal mechanisms of Google Tag Manager, exposed in the data model because that’s what GTM uses as a key structure for its own operations, too.
Exposing the computed state like this could be useful when debugging GTM without the benefit of accessing Preview mode.
Summary
The key takeaway of this article is that you can easily override dataLayer.push in case you want to add your own side effects to calls to that method.
It’s important to do this safely. You need to store a reference to previous implementations of dataLayer.push, and once your own changes have been applied, you need to pass whatever was pushed to this stored reference.
If you neglect to forward the method arguments to the old dataLayer.push reference, GTM will break because it no longer has access to what is added to the dataLayer array.
If you have other interesting use cases in mind for overriding dataLayer.push, I’d love to hear about them in the article comments!
9 Responses
What is the best place to add this code? We are trying to add it via GTM Tag. So far, unsuccessfully. Thank you!
Hi!
Best place would be outside GTM, but it does work in a Custom HTML tag, too. If it doesn’t, make sure the code validates, that you’ve wrapped it with
<script>tags, and that the dataLayer is actually active on the page.Thank you Simo! It works now.
Glad to hear! 🙂
Great article, I’ve been trying a version of this within a template, this is what I’ve come up with below.
The slice.call doesn’t work in a template, so I’ve gone with just putting the arguments[0] in an array.
Used setInWindow for the old push and callInWindow to return in my new push expression.
const log = require(‘logToConsole’);
const copyFromWindow = require(‘copyFromWindow’);
const setInWindow = require(‘setInWindow’);
const callInWindow = require(‘callInWindow’);
const dataLayer = copyFromWindow(‘dataLayer’);
setInWindow(‘custom_dataLayer_push’,dataLayer.push,true);
const new_push = function() {
var states = [arguments[0]];
return callInWindow(‘custom_dataLayer_push.apply’,dataLayer,states);
};
setInWindow(‘dataLayer.push’,new_push,true);
Hello Simo,
Our google marketing team wants to have in datalayer only what was pushed for each event, meaning i need somehow to clear datalayer before each push. Is that even possible? We are using Vue SPA.
Here is our base method that we use for:
pushToDataLayer(data: DataLayer) {
/* Log events on dev and staging */
if (config.ENV !== ‘production’) {
console.log(‘analytics [GA4] pushToDataLayer’, data);
}
/* Don’t send events on development */
if (config.ENV === ‘dev’) {
return;
}
try {
window.dataLayer = window.dataLayer || [];
window.dataLayer.push(data);
} catch (error) {
console.error(error);
}
},
and just before each method call we clear ecommerce object
this.pushToDataLayer({ ecommerce: null });
but now they apparently want to clear the whole dataLayer before each new push, can it be done on the FE without doing anything in gtm dashboard?
Thank you,
Best regards
Hi
It’s *not* a good idea and can lead to breakage, but you can clear the contents of GTM’s data layer with
window.google_tag_manager["GTM-XXXXX"].dataLayer.reset(), where GTM-XXXXX is the container ID.Thanks Simo!
That helped me a lot, one question: How can I filter the state modifications by specific events (considering the use case #2) ?
Hi!
You can check
state.eventin the forEach loop to check which event is in question.