
The question we’re going to be looking at today is inspired by our course, Server-side Tagging In Google Tag Manager.
How do I set up a same-origin deployment in server-side Google Tag Manager?
When you deploy server-side Google Tag Manager, you have basically two options for setting up a custom domain mapping.
- You can use a subdomain of the website, or
- You can use a sub-folder of the website.
If the website is hosted at https://www.teamsimmer.com/, option (1) would correspond with something like https://sst.teamsimmer.com/, and option (2) would be something like https://www.teamsimmer.com/measure/.
While a subdomain setup is far simpler and comes with largely the same benefits (and it’s the one we walk through in detail in our course on server-side tagging), there is a growing demand for sub-folder or same-origin deployments.
This is because technologies like WebKit’s Intelligent Tracking Prevention are cracking down on how browser cookies are sent and set in HTTP requests and responses. Currently, a same-origin deployment is “safest” when it comes to cookie lifetimes.
Do note that there is no guarantee that WebKit won’t crack down even more on how cookies are being set, especially if marketing setups start utilizing same-origin deployments more and more to circumvent WebKit’s tracking protections.
In this article, I’ll show you how to set up a same-origin deployment of server-side Google Tag Manager.
There are two prerequisites before we can get started, though.
- You need an existing server-side Google Tag Manager deployment with a publicly accessible URL.
- You need the Cloudflare Free plan, and your website (sending the requests) needs to be proxied by it.
Video walkthrough
If you prefer this walkthrough in video format, you can check out the video below.
Don’t forget to subscribe to the Simmer YouTube channel for more content like this.
What is a same-origin deployment?
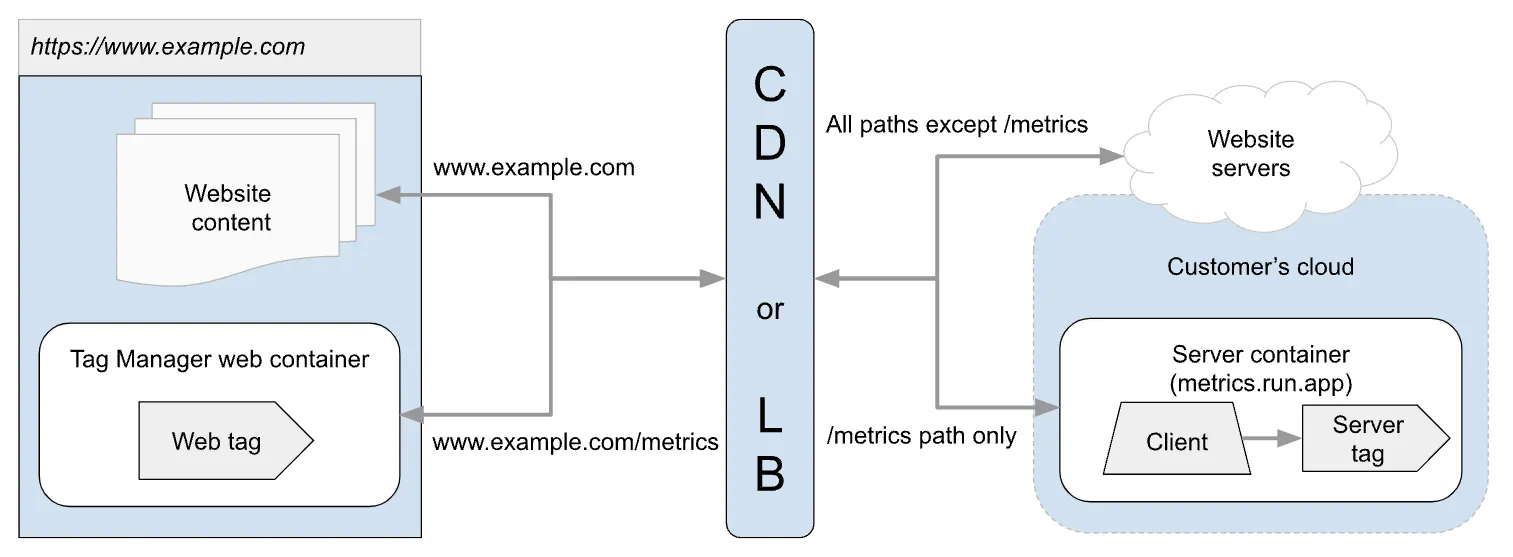
Same-origin means that the client that dispatches the request and the server-side Google Tag Manager share the same URL origin. URL origin is the part of the URL that contains everything up to the first path selector. So if the URL is:
https://www.teamsimmer.com/some-path/another-path/The URL origin would be https://www.teamsimmer.com.
With server-side Google Tag Manager, it means that the SGTM endpoint responds at a sub-folder of this URL, reserved solely for SGTM requests. In this case, we could configure all requests to https://www.teamsimmer.com/measure/, for example, to be forwarded to server-side Google Tag Manager.
This protects against things like Intelligent Tracking Prevention and many ad blockers, because there is no way for these technologies to distinguish between the website itself and the tracking host by looking solely at the URL origin.
Here is Google’s own diagram showing how the technical setup works (you can read Google’s documentation here):
Getting started
Assuming you now have a server-side Google Tag Manager deployment with a publicly accessible URL and you’ve chosen a path that will be reserved solely for SGTM requests, you can now browse to your Cloudflare dashboard and add a new Worker.

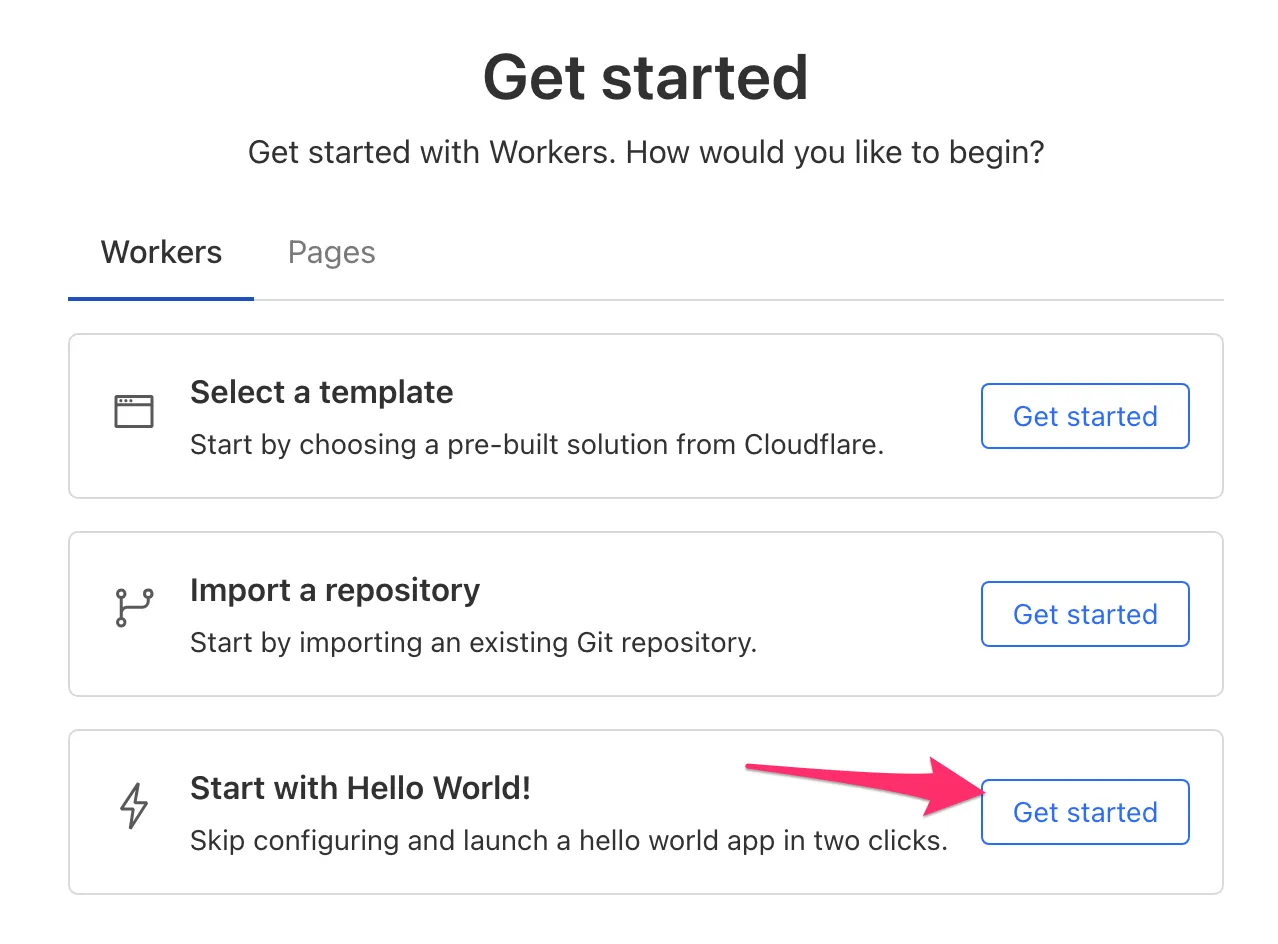
If you’ve never created a Worker before, you need to choose a template. Select the Start with Hello World! template. If you already have Workers, just click to create a new one.
In the next screen, give the Worker a name and hit Deploy. You don’t have to worry about deploying the code – it won’t do anything until triggered.
In the Worker JavaScript editor, clear all the code within and replace it with this block:
export default {
  async fetch(request, env, ctx) {
    const url = new URL(request.url);

    // Replace /path with the path you've chosen
    const upstreamPath = url.pathname.replace('/path', '') || '/';
    // Replace https://www.mydomain.com with your domain
    const upstreamUrl = new URL('https://www.mydomain.com');
    upstreamUrl.pathname = upstreamPath;
    upstreamUrl.search = url.search;

    const reqInit = {
      method: request.method,
      headers: new Headers(request.headers),
      body: request.method === 'GET' || request.method === 'HEAD'
        ? undefined
        : request.body,
      redirect: 'follow'
    };

    reqInit.headers.set('X-Forwarded-Host', url.host);
    reqInit.headers.set('X-Forwarded-Proto', url.protocol.replace(':', ''));
    reqInit.headers.delete('Host');
    reqInit.headers.set('Cache-Control', 'no-store');

    const upstreamResp = await fetch(upstreamUrl.toString(), reqInit);

    return new Response(upstreamResp.body, {
      status: upstreamResp.status,
      statusText: upstreamResp.statusText,
      headers: upstreamResp.headers
    });
  }
};
First, the entire Worker code is wrapped within an export default block, which is required for the modular code that Workers use.
Next, there’s another wrapper, async fetch(...), which indicates that the Worker is triggered when HTTP requests are intercepted by Cloudflare.
Replace the /path string and the https://www.mydomain.com strings with the path you’ve selected for SGTM and your domain name, respectively.
The first half of the code block takes the incoming request to Cloudflare (dispatched by your website), copies its headers and body content, and forwards it all to your server-side Google Tag Manager container.
Cloudflare doesn’t let Workers overwrite the Host header of outgoing requests, so you need to use a custom X-Forwarded-Host header instead. Don’t worry, server-side Google Tag Manager knows how to read this! This header is vital because it instructs server-side Google Tag Manager on which domains it can write the cookies in the HTTP response.
Remember to also set the Cache-Control header. You don’t want Cloudflare to cache your Google Tag Manager requests, or you might end up with your analytics pings and content loads getting mixed up.
The last part of the code block sends the compiled request to server-side Google Tag Manager. It waits for server-side Google Tag Manager to respond, at which point it takes the body, HTTP status information, and headers of this response and forwards them back to the web browser.
In this way, the Worker acts as a transparent proxy, dispatching all requests to https://www.mydomain.com/path/ to server-side Google Tag Manager, and responding back to the browser with whatever SGTM responded with in turn.
Congratulations! You’ve successfully built a reverse proxy with Cloudflare Workers.
Deploy the Worker and configure the route
Once you’re happy with the code, deploy it.
Next, navigate to the Worker Settings, and choose + Add to add a new route under Domains & Routes.
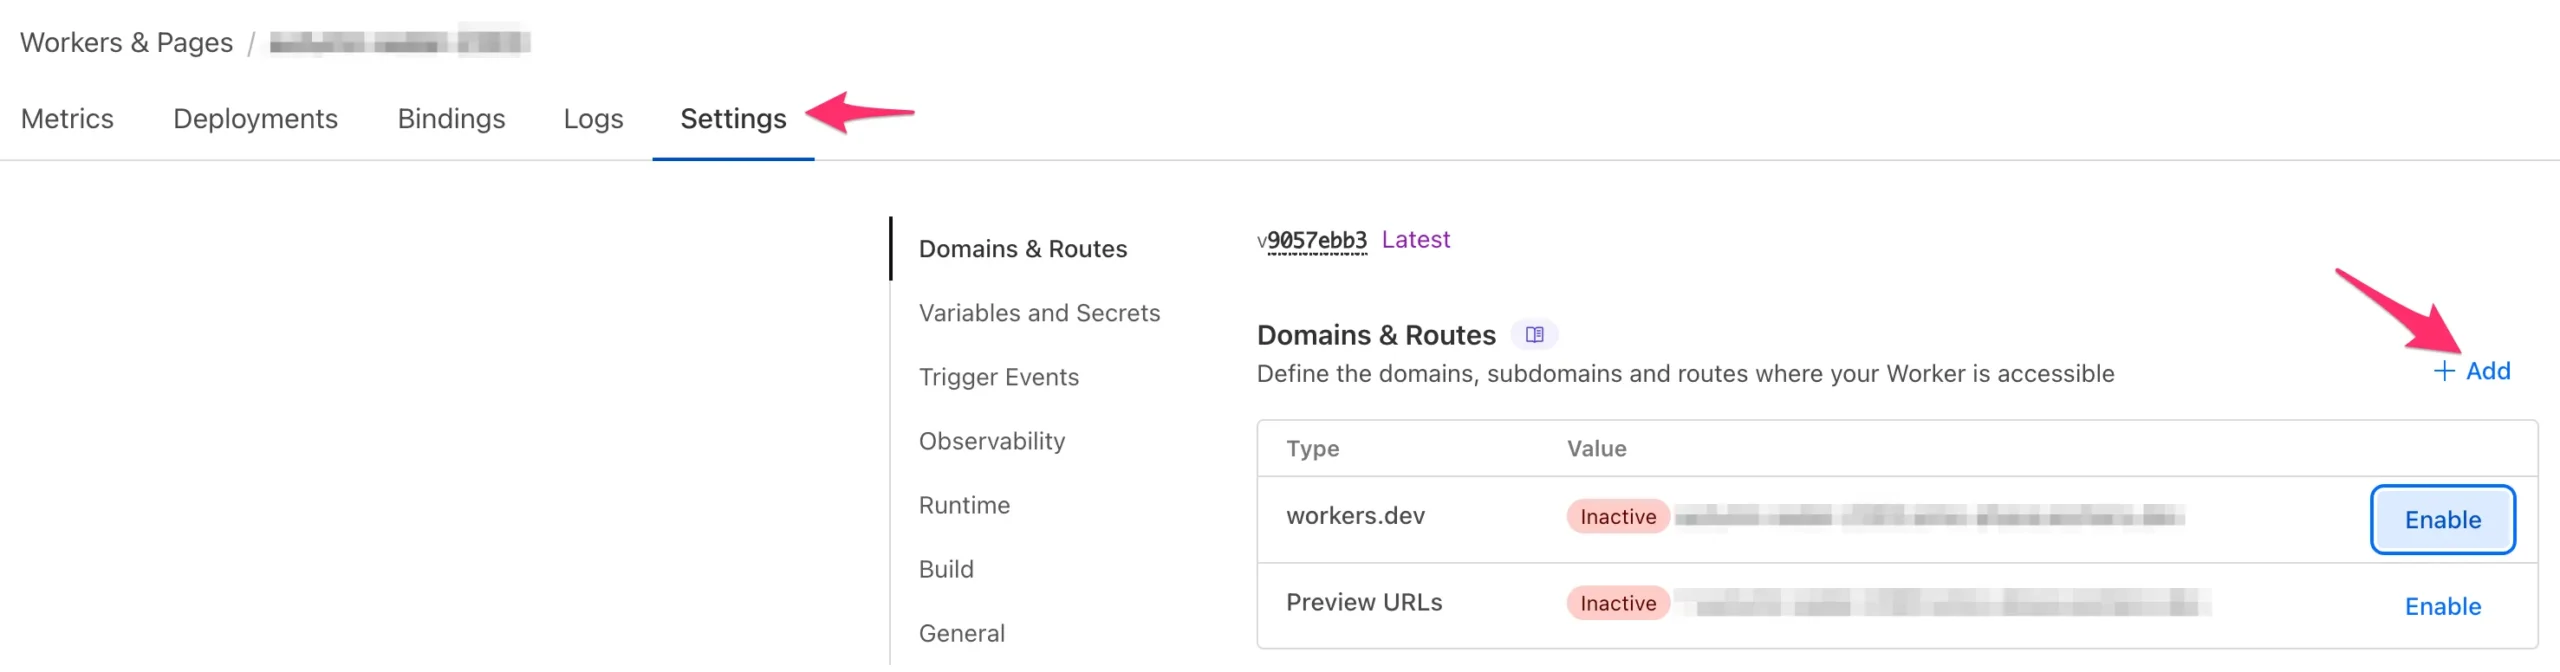
In the flyover, select Route to map a URL pattern to your Worker.
Next, choose your Cloudflare Zone (the one that hosts your website records). Set the Route pattern to match all traffic to your selected sub-folder, for example:
*.teamsimmer.com/measure/*
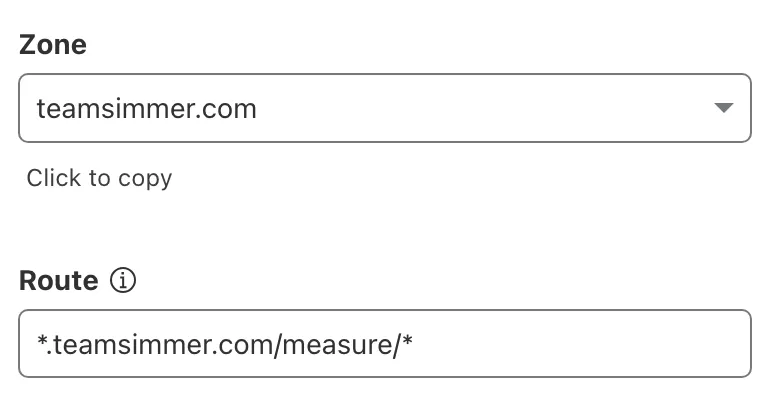
Once ready, click Add route.
Nice, your Cloudflare Worker setup is now complete!
It’s time to head over to Google Tag Manager to test things.
Test with a client-side GA4 tag
The easiest way to make sure everything works is to create a new Google Tag with a GA4 Measurement ID. For testing purposes, this can be your real GA4 Measurement ID or it could be a dummy ID – doesn’t really make any difference since you’ll be sending just a single request.
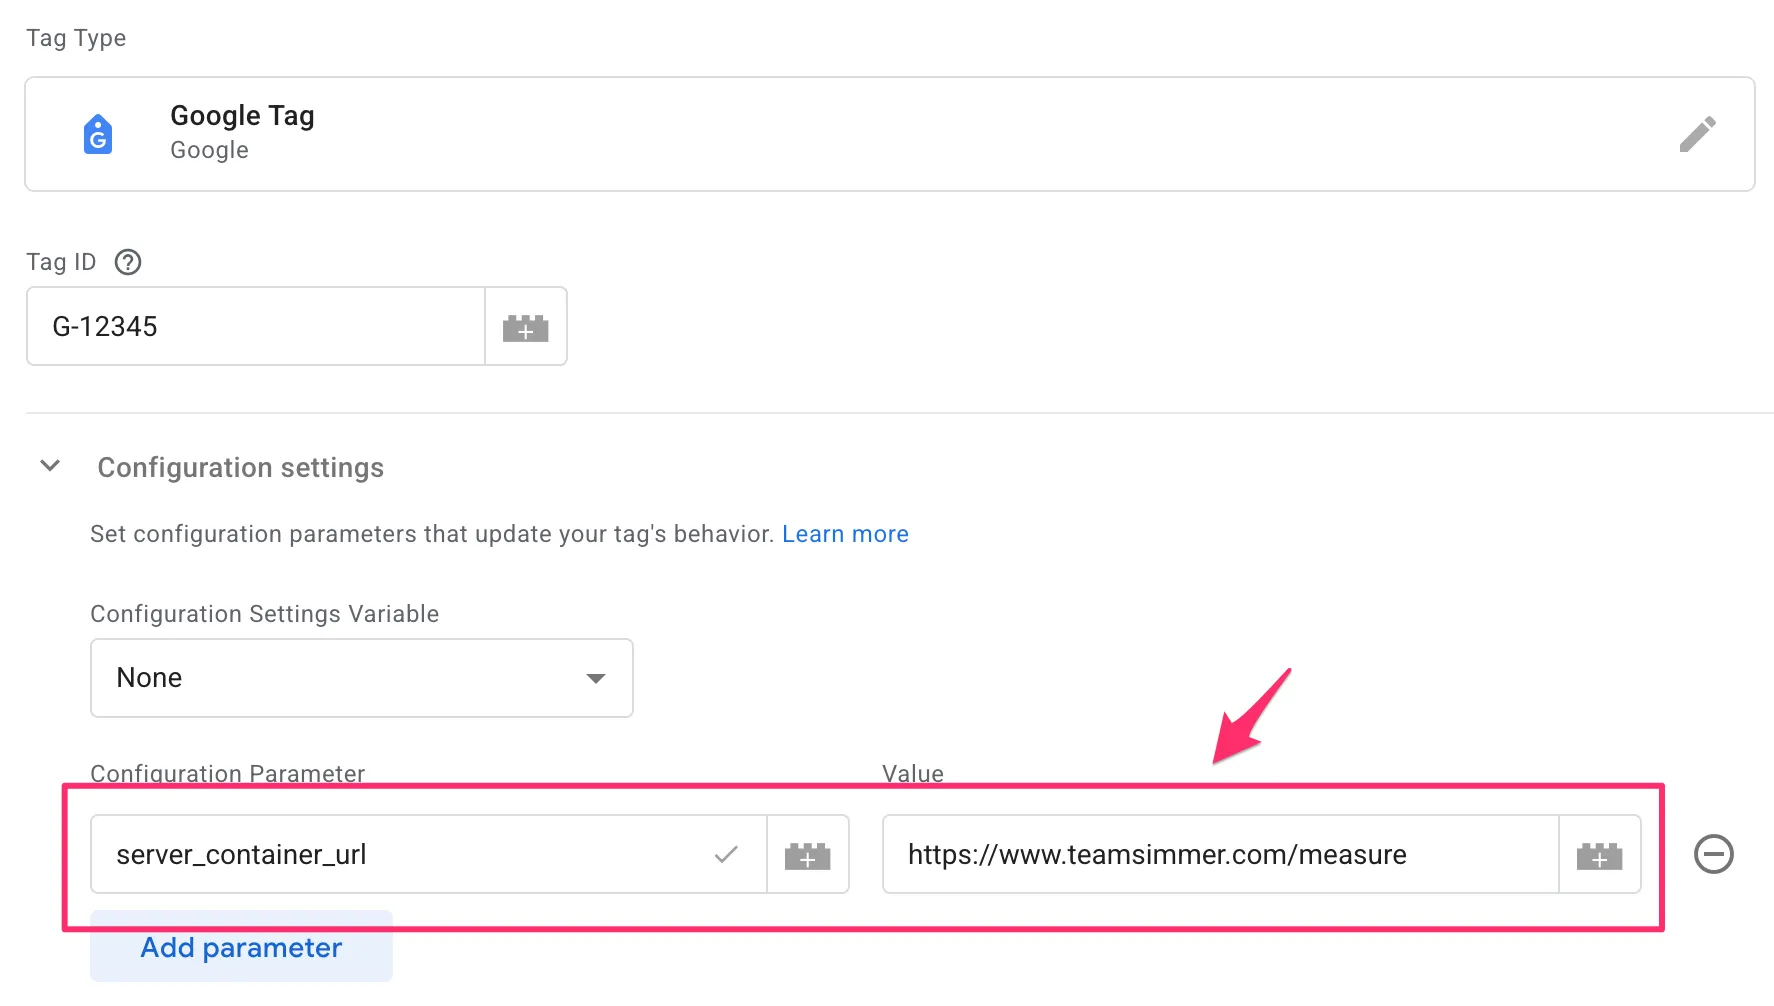
Add the server_container_url field to your Google Tag, and set it to point to the hostname and the sub-folder path you configured for your same-origin deployment.
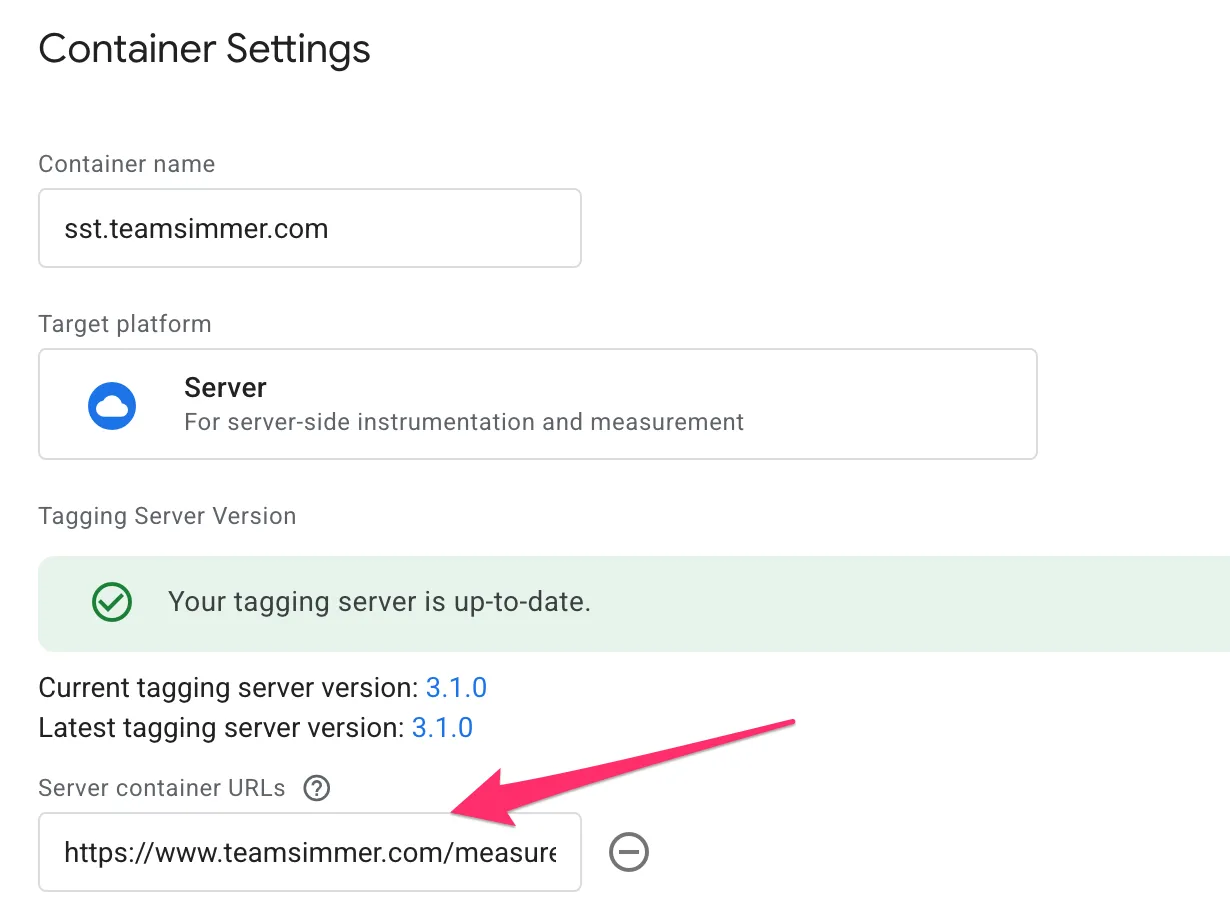
If you want, you can also edit your server-side Google Tag Manager container settings and add the new sub-folder deployment path to the Server container URLs list:
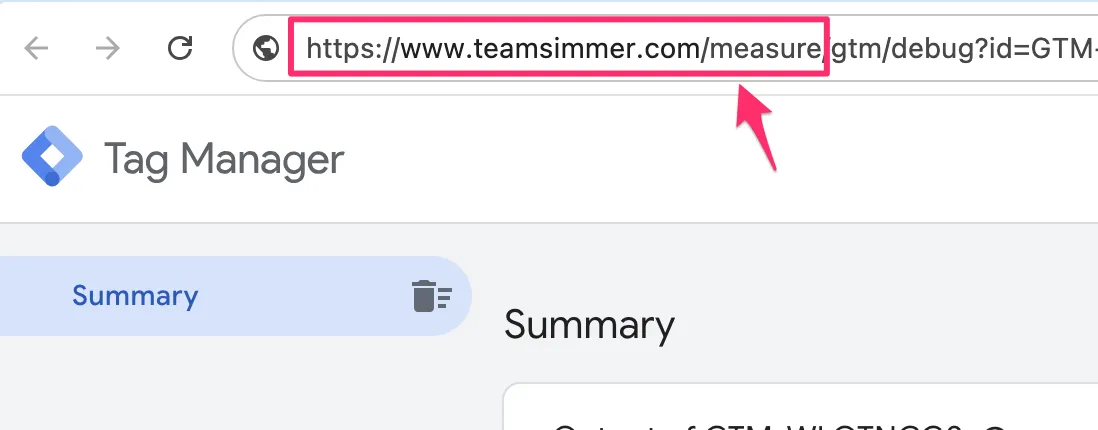
Now, hit Preview on both the web container and the server container.
The server-side Google Tag Manager container should open Preview mode successfully in the path that you reserved for your same-origin deployment. Check the browser address bar to confirm.
You should also see incoming requests from your client-side container. Look for a Google Tag page_view request and click to open the Incoming HTTP Request details.
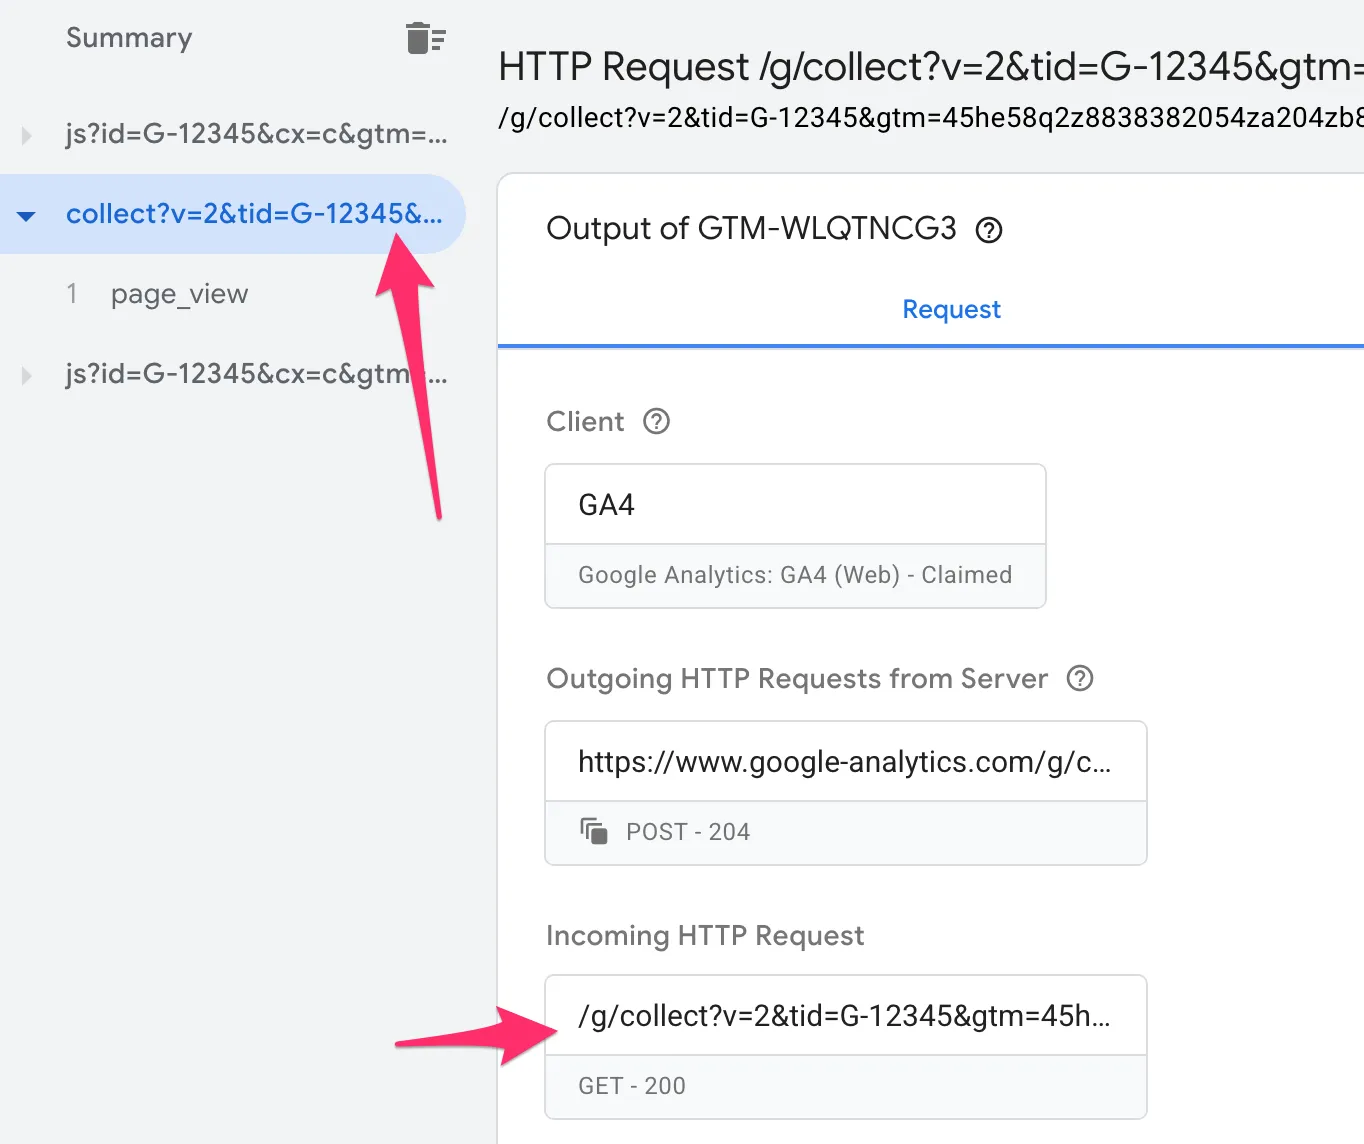
Scroll down to the HTTP response and you should find a Set-Cookie header that successfully sets the FPID cookie on the correct domain (your website’s naked domain name):
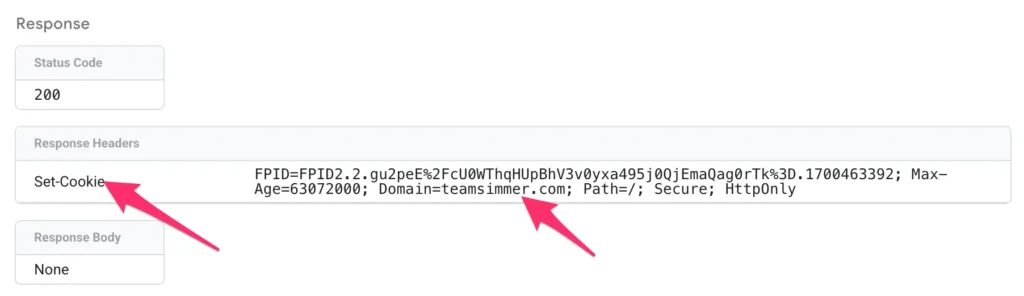
If you see this, it means your setup is working!
If you don’t see a request, but server-side GTM preview mode did open correctly, it means the client-side Google Tag is misconfigured, and you need to double-check the server_container_url value.
If preview mode didn’t open for your server-side GTM container, it means that Cloudflare isn’t capturing the route correctly. In this case, the problem might be in the Worker’s route setting, or it could be that Cloudflare isn’t actually proxying your website traffic correctly.
Summary
Hopefully, this article demystified same-origin setups somewhat.
Workers aren’t necessarily the most intuitive technology to build with, but suffice to say that they do their job beautifully if configured correctly.
Now, I don’t recommend a same-origin setup over a subdomain setup (or vice versa). In fact, I think that for the majority of deployments, a subdomain setup is easier and perfectly adequate for marketing use cases.
However, if your website is already a Cloudflare proxy, setting up the same-origin deployment is a breeze.
Having said that, there’s quite a bit of unwarranted fear and speculation regarding WebKit’s (and Safari’s) actions against browser cookies. LinkedIn, in particular, is full of people selling snake oil, claiming that your cookies are going away and your attribution is dying.
That’s not even remotely true.
Platforms like Google Ads, Meta, LinkedIn, and Bing have been optimizing and modeling for years against Safari’s (and other browsers’) actions against first-party storage. A subdomain deployment, which by the way can also be configured to prolong cookie lifetimes, is typically quite sufficient to withstand attribution issues, even from iOS browsers and desktop Safari.
If you want to deploy server-side Google Tag Manager with a same-origin configuration, feel free to do so. But don’t do it because someone on LinkedIn said it’s the only way to get your data back.
Same-origin deployments come with some risks. Ad blockers that use dynamic domain mappings might flag your entire website host as a tracking domain because they see tracking requests getting sent to your main domain rather than to a subdomain.
WebKit might see a surge in same-origin workarounds against their cookie protections, and in response, they might retaliate by constricting cookie use even further.
Whatever reason you choose for one deployment or another, make sure it’s founded on a good understanding of what such deployment requires and what the potential repercussions are.

9 Responses
Simo. Is the idea behind same origin that it doesn’t have to pass the first 2 octet test a subdomain does to get cookie extension past 7 days? Is this the only reason this is suggested or am I missing something?
Side note. Do you know of a way to test whether the set cookie command worked in WebKit? I believe there’s some rule where cookie life is related to the number of days the browser was used… how can one actually test they achieved 1 year cookie life in WebKit?
Thanks!
Hi Jon
Yes, that’s pretty much it. And yes, it’s that underwhelming 🙂 I don’t personally see the benefit for 90% of the sites / analytics setups I work with. It’s quite a bit of work for marginal gains, and it carries the risk of the main domain being flagged as a tracker by ad blockers and such.
As for testing if Set-Cookie works, Safari still overrides the expiration date for server-set cookies. So if you try to set a 7+ day cookie and you haven’t mitigated against IP cloaking protection, you should see the expiration still set to maximum 7 days.
The “7 days of browser use…” thing applies to JavaScript cookies only. Here’s a handy reference: https://www.cookiestatus.com/
You’re the best Simo! Thanks! New Big Query course is FANTASTIC so far BTW!
Thank you for the kind words!
OK, so given this, it offers no extra benefit than proxying your sGTM subdomain through the same IP as your website (also using Cloudflare)?
Hi Nick
I can’t think of any other relevant benefits from same-origin deployment vs. subdomain deployment with an overlapping IP range. I think subdomain setups are also cleaner, because you isolate marketing / analytics tracking to a specific hostname and don’t have to worry about routing rules and remembering path signatures in the tag settings, etc.
Hi,
FYI, when your hosting your server side tag with Stape.io.
the worker script should include:
reqInit.headers.set(‘X-From-Cdn’, ‘cf-stape’);
otherwise all traffic in GA4 will get the location from your “stape” container.
Thanks for the article Simo! I’ve followed it and for some reason when I preview the SGTM, it just open the website with the path like mydomain.com/measure/gtm/debug?id=GTM-XXXXX>m_auth=4vX4v6Ijko1-csgdxagG7A>m_preview=env-4&hl=en
If I type /measure/healthy, it also loads the webpage instead of showing “ok”
For reference, my GCP build is running on ss.mydomain.com
Do you know what might be happening?
Hi
It means that you haven’t configured the route trigger to pass all traffic to /measure/* to the Worker. That’s a required step if you want Cloudflare to intercept the /measure/ traffic and activate the worker.